Test Studio
ZeuZ Test Studio is an AI-powered testing environment that integrates test case management, test automation, and test execution within a unified platform. It enables testers to progress from interpreting test requirements to creating, organizing, automating, and executing test cases through a structured workflow.
Test Studio uses AI to collect relevant context, analyze application behavior and testing requirements, organize test information, and scaffold automation. This enables testers to develop and prepare test cases more efficiently while maintaining a close relationship between each test case and its associated automation.
The platform also supports the execution of automated test cases and provides detailed execution information to help testers evaluate test outcomes. By combining AI-assisted capabilities with an end-to-end test case workflow, ZeuZ Test Studio offers a more efficient, consistent, and organized approach to software test management and automation.
Why it matters / Use Cases:
- AI-assisted test creation: Helps interpret requirements and application context to create structured test cases.
- Test automation: Helps build automation from test cases, reducing the effort required to prepare automated tests.
- Centralized test management: Allows testers to create, organize, and maintain test cases together with their associated automation.
- End-to-end test workflow: Supports the process from understanding requirements and creating test cases to automating and executing them.
- Test execution and validation: Enables automated test execution and provides execution information for evaluating results.
- Efficient and scalable testing: Helps teams increase automation coverage while maintaining a consistent and organized testing workflow.
Workspace
-
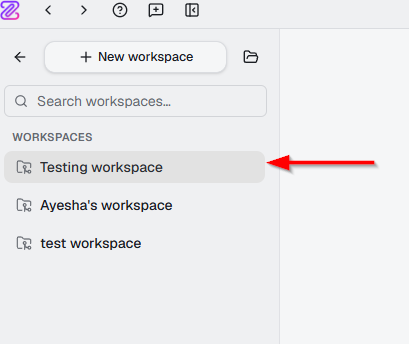
After creating a new workspace, it will be displayed under Workspaces.
 note
noteUsers with access to the specific workspace can also be invited using the Search users option.
Settings
- Click the button next to the profile icon.
- After clicking the Settings button, users are directed to the "Account Settings" page.
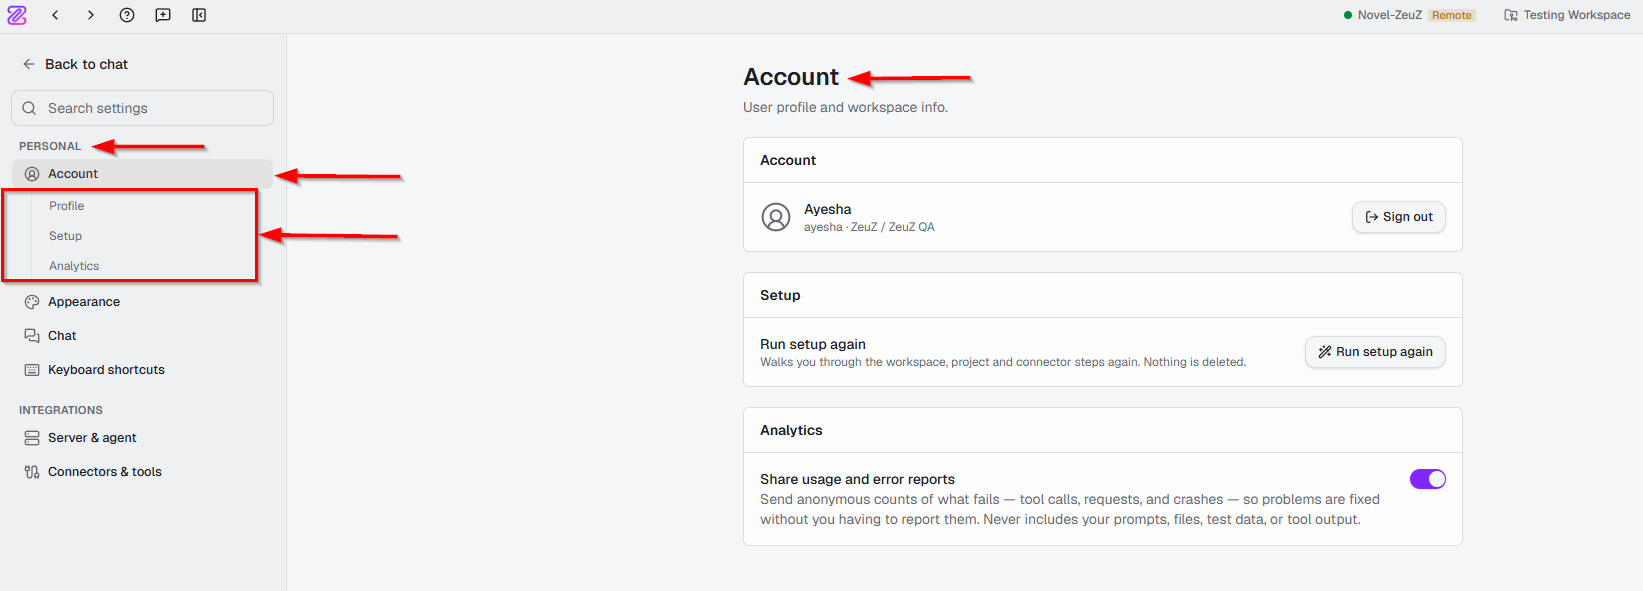
- The "Account Settings" page is part of the two sections Personal and Integrations settings in Test Studio. The two sections contain the following parts, as mentioned below:
Personal
- It refers to the settings that are specific to the individual user rather than to the entire workspace or organization.
-
Account:
- Profile: Displays the user's profile information, including the username and associated ZeuZ workspace. The Sign out option allows the user to sign out of the account.
- Setup: Provides the Run setup again option, which allows users to repeat the workspace, project, and connector setup process without deleting existing data.
- Analytics: Includes the Share usage and error reports option. When enabled, anonymous usage and error information can be shared to help identify and resolve issues. The description states that prompts, files, test data, and tool output are not included.
-
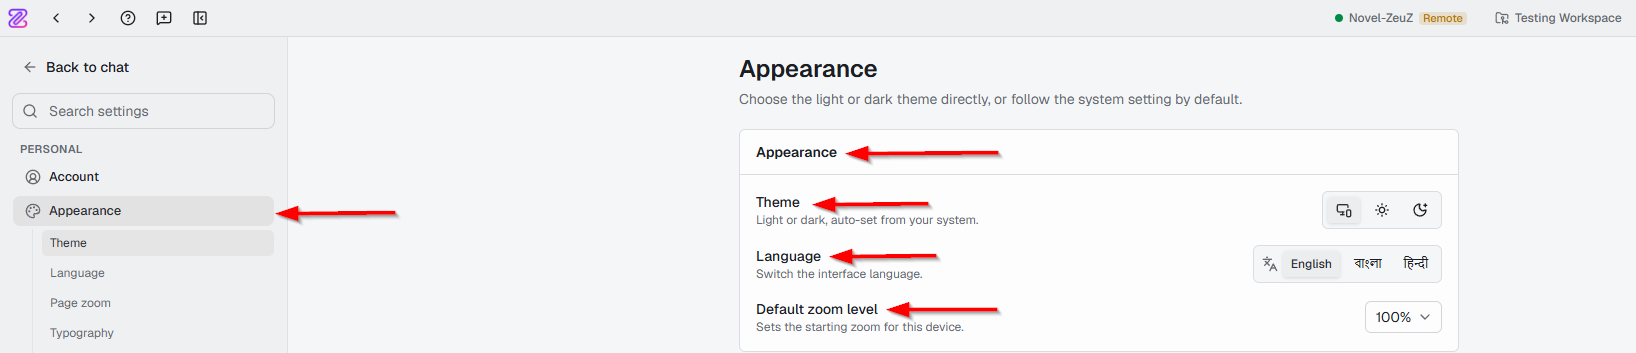
Appearance:
- It allows users to customize how Test Studio looks and behaves on their device. It provides options for changing the theme, interface language, zoom level, font sizes, and sidebar navigation. The page contains the following sections:
- Theme: Allows users to choose between Light, Dark, or System mode.
- Language: Allows users to change the interface language. The available options shown are English, বাংলা, and हिन्दी.
- Default zoom level (Page zoom): Sets the default zoom level for the interface, for example: 50%, 100%, 150% etc.
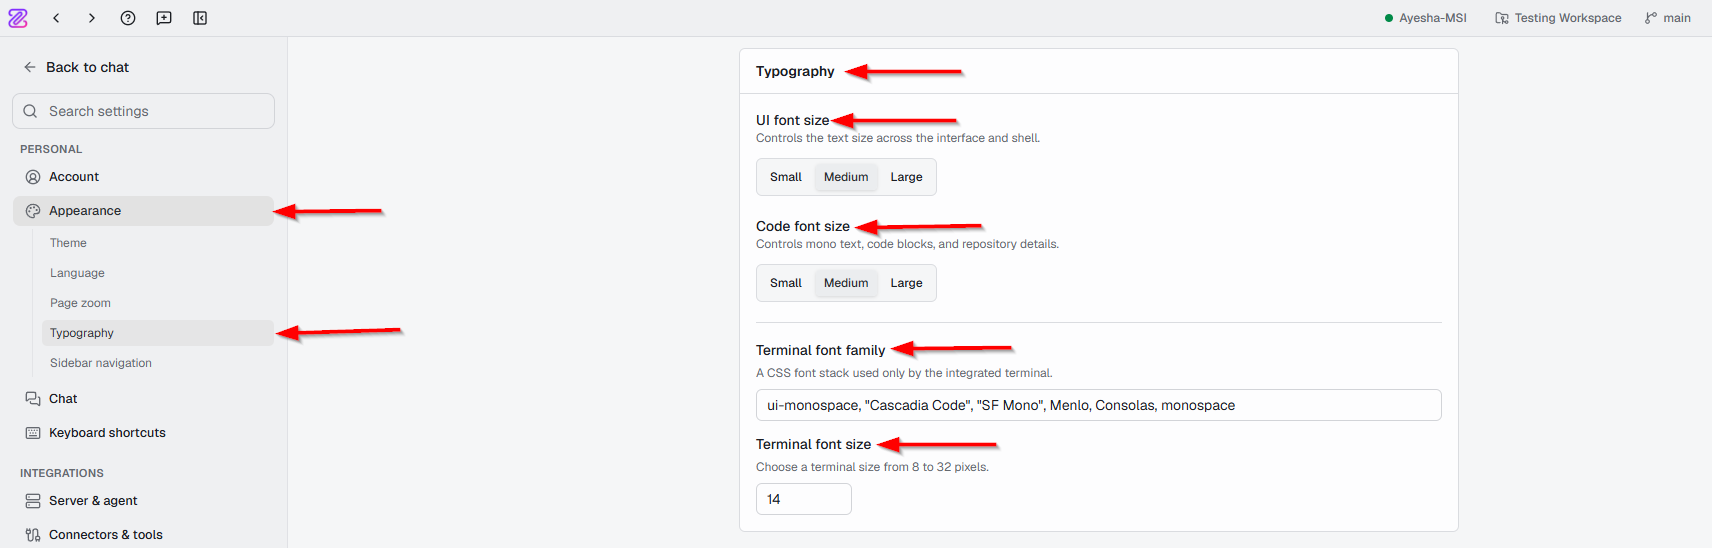
- Typography: It is under the Appearance point. It allows users to customize the text appearance in Test Studio, including the interface, code, and integrated terminal. It provides the following options:
- UI font size: Controls the text size across the Test Studio interface and shell. Users can choose Small, Medium, or Large.
- Code font size: Controls the size of monospaced text, code blocks, and repository details. Users can choose Small, Medium, or Large.
- Terminal font family: Allows users to specify the font family used in the integrated terminal.
- Terminal font size: Allows users to set the terminal text size from 8 to 32 pixels.
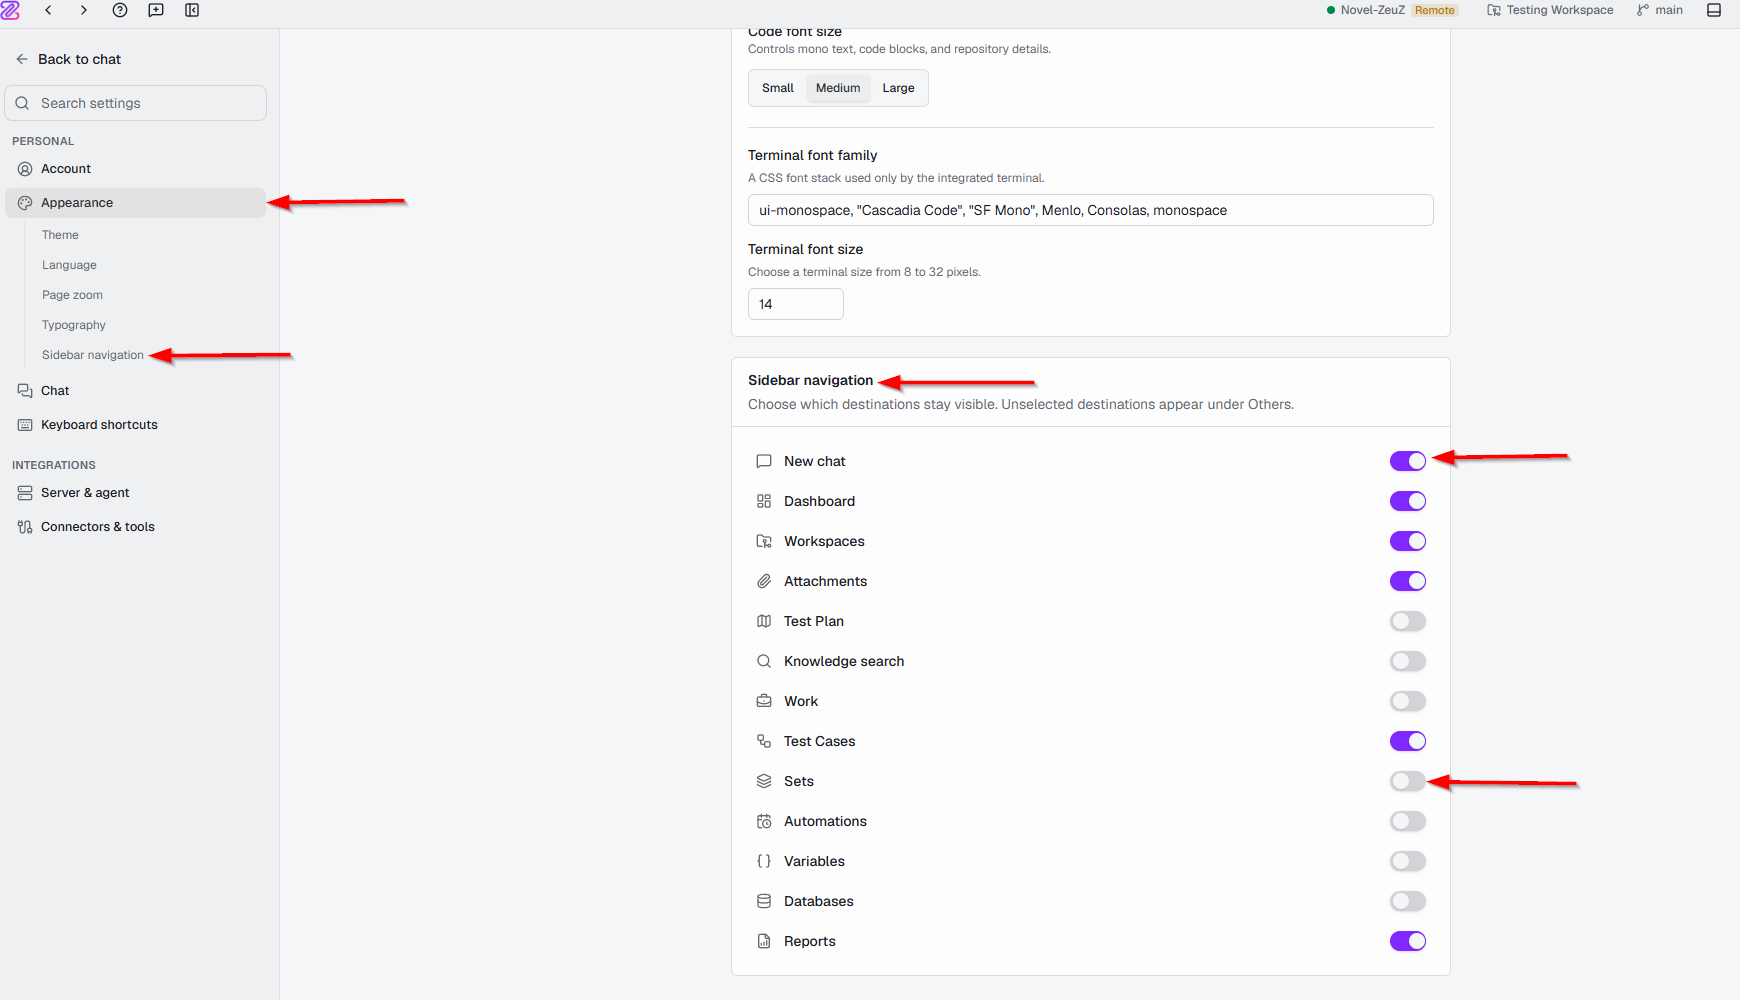
- Sidebar navigation: The Sidebar navigation section allows users to control which destinations are displayed directly in the left-side navigation panel. Users can enable or disable individual options using the toggle switches.
- It allows users to customize how Test Studio looks and behaves on their device. It provides options for changing the theme, interface language, zoom level, font sizes, and sidebar navigation. The page contains the following sections:
-
Chat:
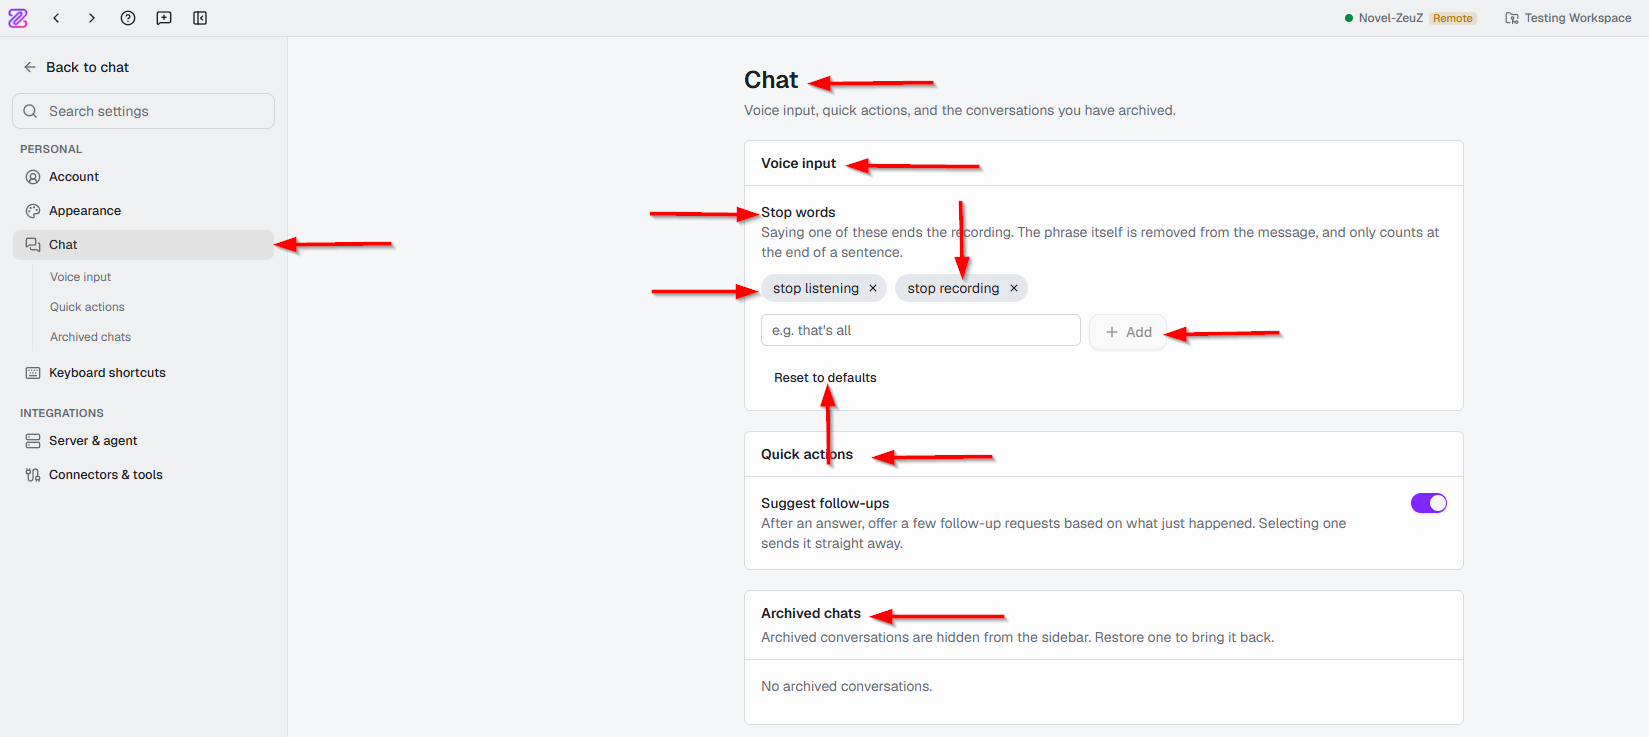
- It is the settings area for managing conversation-related features, including voice-input stop words, quick actions, and archived conversations. The page contains the following options:
- Voice input: Users can define “stop words” that end a voice recording. The stop phrase is removed from the message and works only when spoken at the end of a sentence. The default phrases are “stop listening” and “stop recording”.Users can add new phrases, remove existing ones, or reset them to the defaults.
- Quick actions: The Suggest follow-ups option displays relevant follow-up requests after an answer. Selecting a suggestion sends it immediately.
- Archieved chats: This section displays conversations removed from the sidebar and allows users to restore them. Currently, there are no archived conversations.
- It is the settings area for managing conversation-related features, including voice-input stop words, quick actions, and archived conversations. The page contains the following options:
-
Keyboard shortcuts:
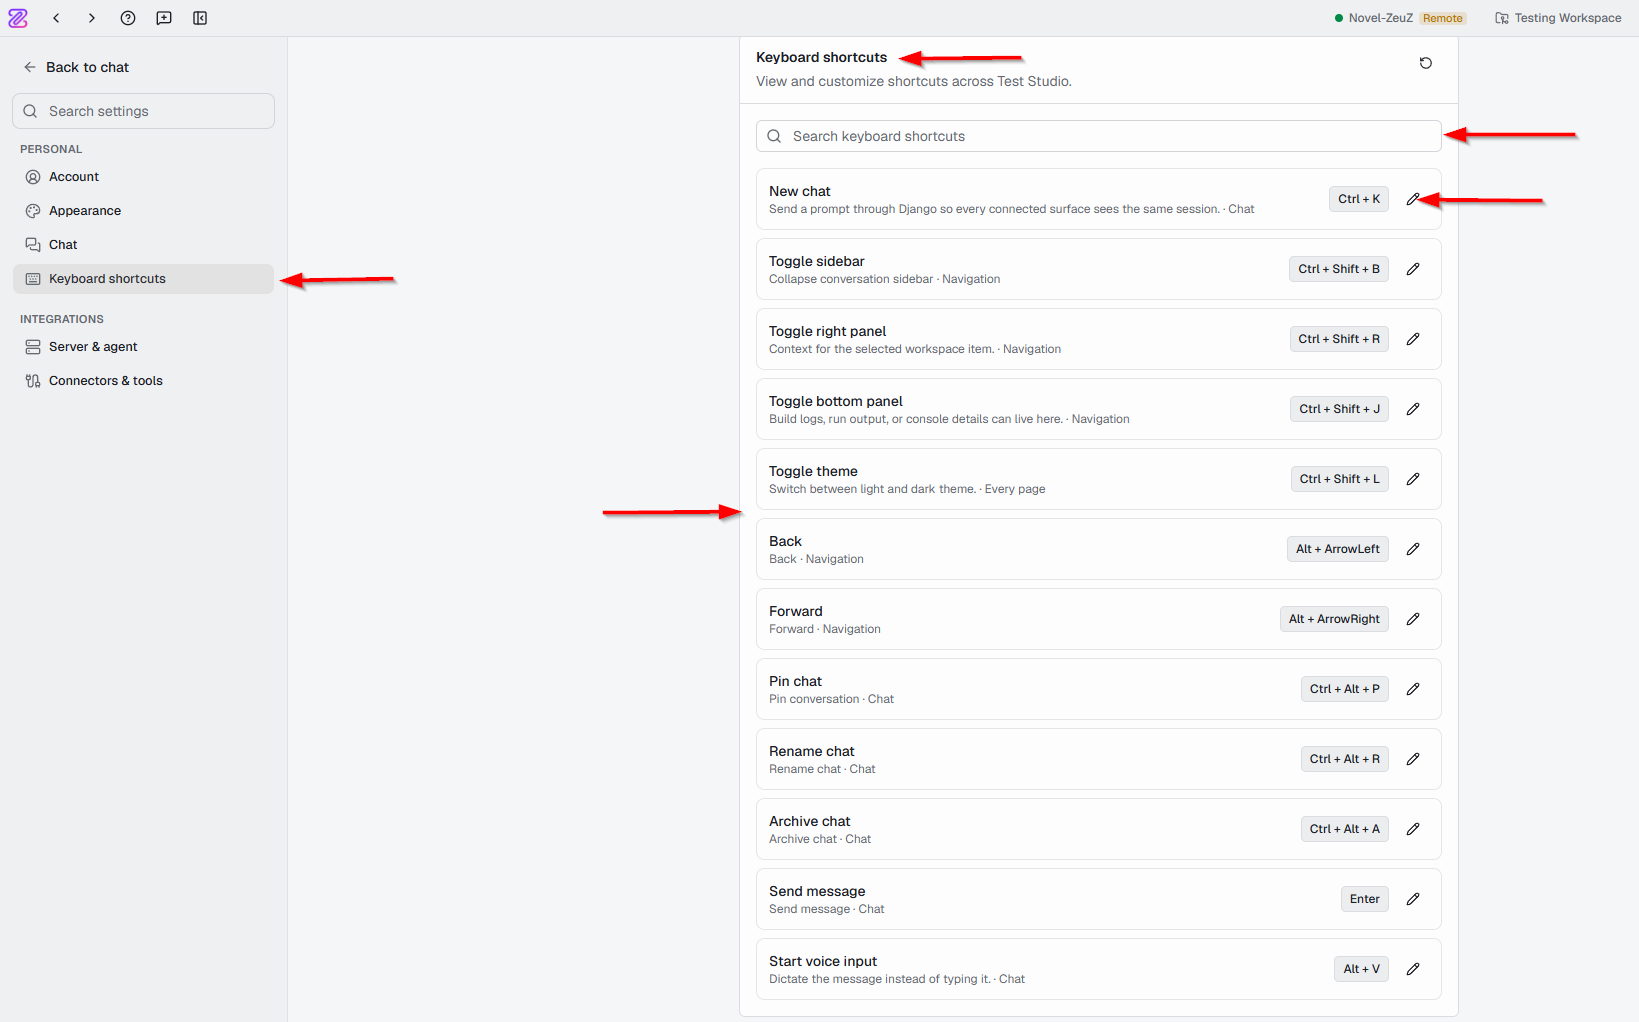
- The Keyboard shortcuts page displays the available keyboard shortcuts in Test Studio. These shortcuts allow users to perform common actions quickly using key combinations instead of navigating through the interface. The page includes:
- Search keyboard shortcuts: Allows users to quickly find a specific shortcut.
- Shortcut list: Displays available actions along with their assigned key combinations.
- Edit option: Allows users to customize the keyboard combination for an action.
- The Keyboard shortcuts page displays the available keyboard shortcuts in Test Studio. These shortcuts allow users to perform common actions quickly using key combinations instead of navigating through the interface. The page includes:
-
Integrations
-
In Test Studio, Integrations means the settings used to connect Test Studio with external systems and supporting services. It includes the following options:
-
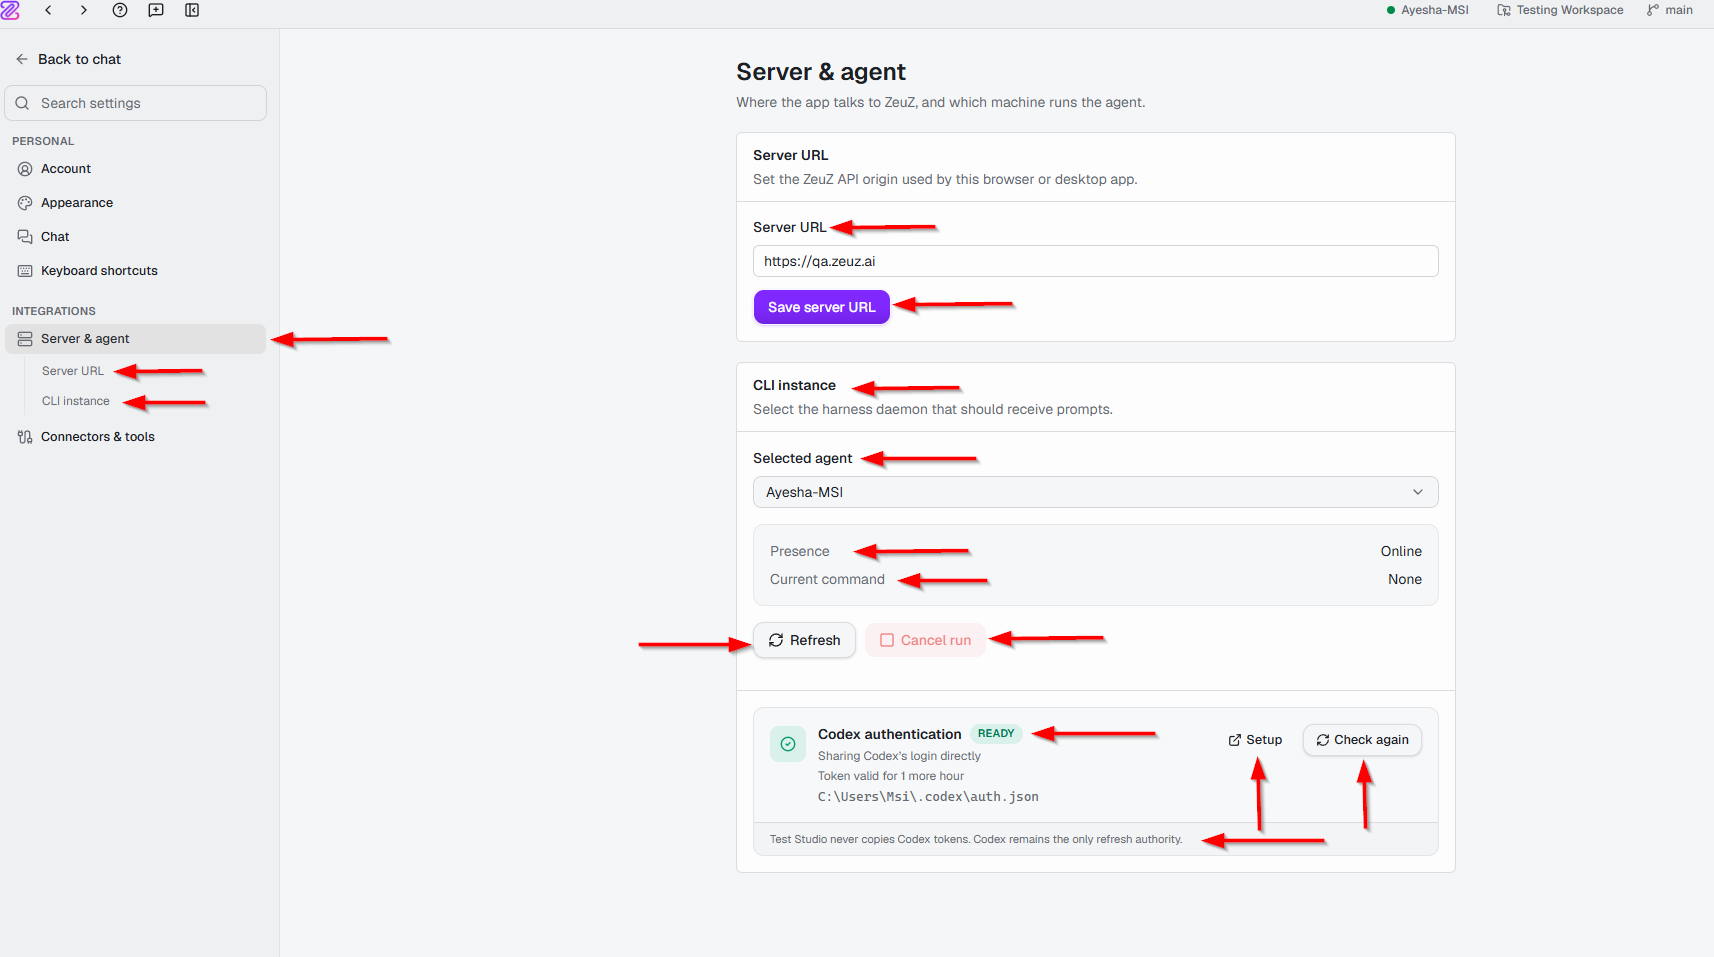
Server & Agents: The Server & Agents section allows users to configure how Test Studio communicates with the ZeuZ server and which local agent is used to process commands. This section contains the following components:
-
Server URL: The Server URL section allows users to specify the ZeuZ API server that the Test Studio browser or desktop application should communicate with.
- Server URL field: Used to enter the URL of the required ZeuZ API server. For example, the field contains http://qa.zeuz.ai, indicating that the application is configured to communicate with a server running locally.
- Save server URL: Saves the entered server URL and applies it to the application.
-
CLI instance: The CLI Instance section allows users to select the local agent that receives prompts from Test Studio. It contains the following options:
- Selected agent: Displays the currently selected agent.
- Presence: Indicates the availability of the selected agent. The status Online means the agent is currently connected and available.
- Current command: Displays the command currently being processed by the agent.
- Refresh: Refreshes the agent status and retrieves the latest information.
- Cancel run: Allows users to cancel an active run. It is disabled when there is no active run.
- Codex authentication: The Codex authentication section displays the authentication status required for Codex. For example,
if the status is “READY”, it indicates that the authentication is currently available. The Codex Authentication section contains the following additional options:
Setup: Allows users to configure Codex authentication.- Check again: Checks the current authentication status again.
- The screen also indicates how long the authentication token remains valid.
noteThe note at the bottom clarifies that Test Studio does not copy Codex tokens and that Codex remains responsible for refreshing its authentication.
-
-
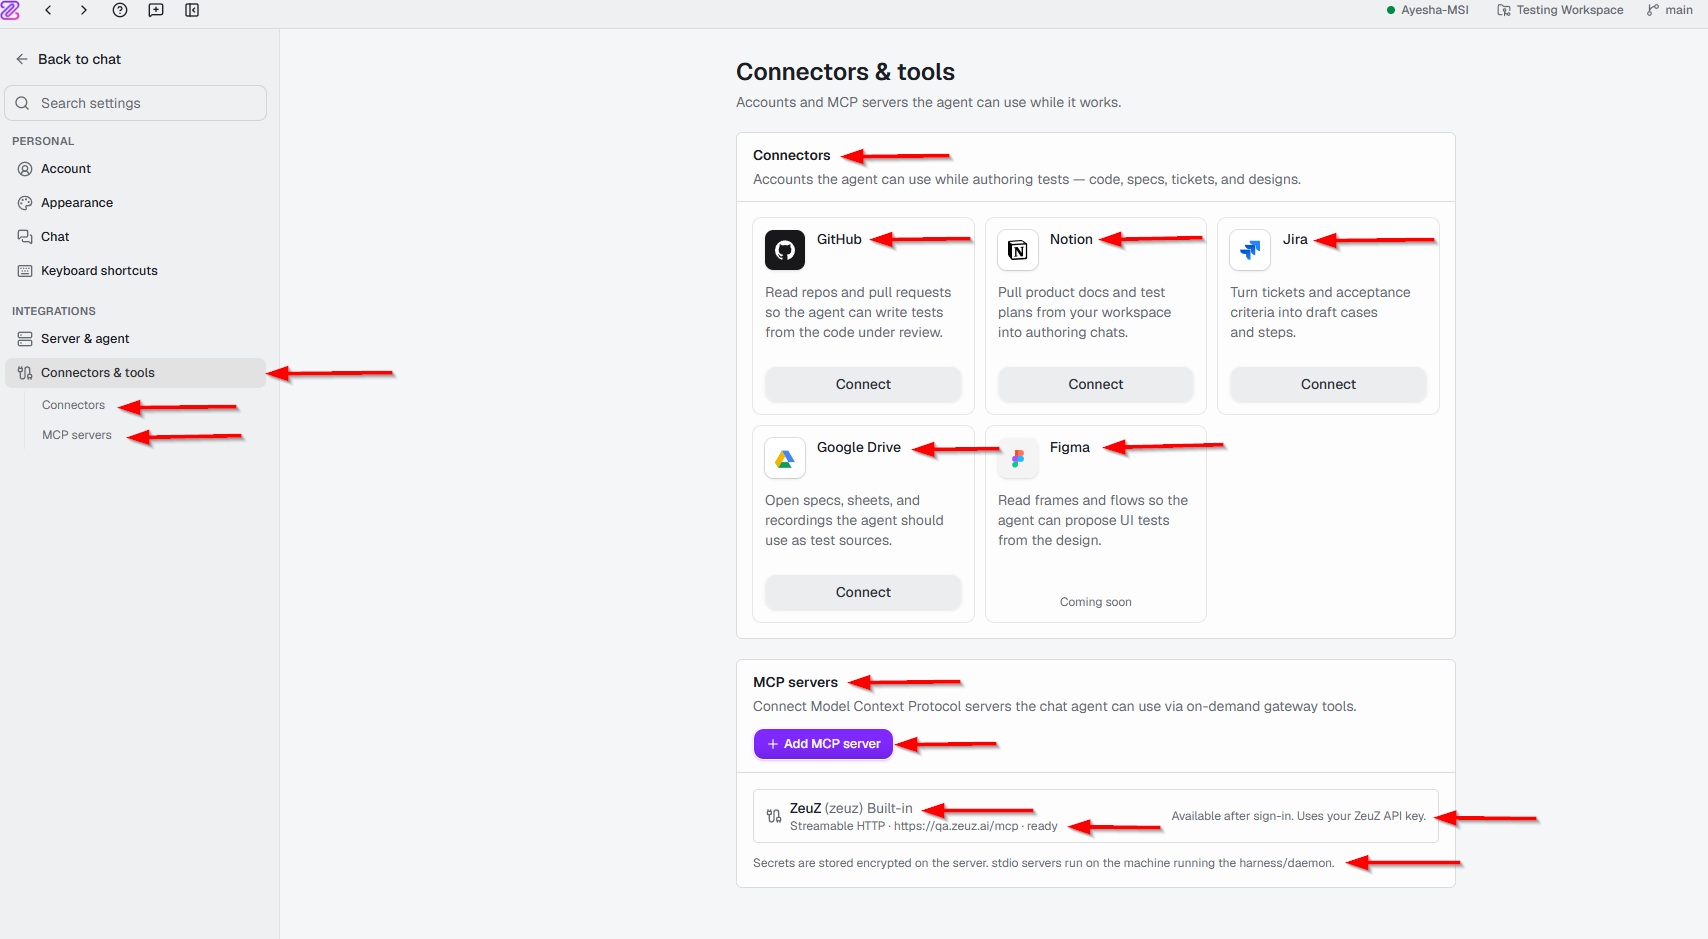
Connectors & tools: It refers to the integrations that allow Test Studio to connect with external services and use them as part of the testing workflow. It contains the following options:
Connectors: Connectors can provide Test Studio with additional project context and information from external services. For example,- GitHub: Provides access to code repositories and development-related information.
- Notion: Provides project documentation and knowledge.
- Jira: Provides project issues, requirements, and task-related information.
- Google Drive: Provides access to relevant documents and project resources.
- Figma: Intended to provide design-related context;currently shown as Coming Soon.
-
MCP servers: It allows Test Studio’s chat agent to connect to external tools and services through on-demand gateway tools, enabling the agent to access additional capabilities when required. The following options are mentioned below:
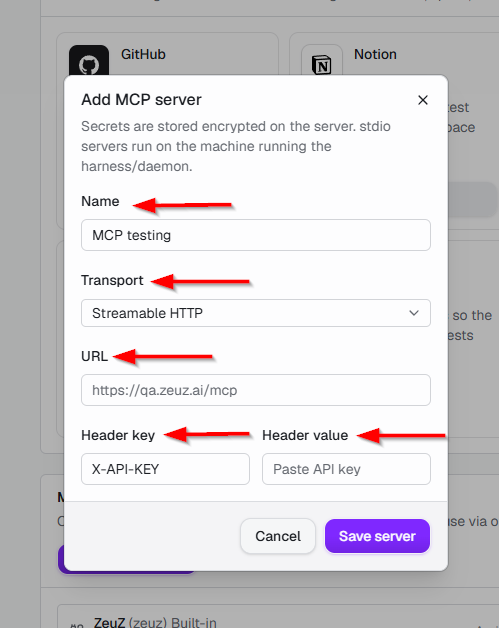
- Add MCP server: Connects another MCP-compatible server to Test Studio. Fill in the following field to add an MCP server:
- Name: A user-defined name for identifying the connection.
- Transport: Selects how Test Studio communicates with the MCP server.
- URL: The MCP server endpoint, shown as https://qa.zeuz.ai/mcp.
- Header key: The authentication header sent with requests, such as X-API-KEY.
- Header value: The corresponding secret or API key.
- Save server: Saves the configuration and adds the server to Test Studio.
- Cancel: Closes the dialog without saving.
- ZeuZ (zeuz) Built-in: The default ZeuZ MCP integration.
- Streamable HTTP: The connection uses the HTTP-based MCP transport.
- https://qa.zeuz.ai/mcp: The MCP server endpoint.
- Ready: The server is configured and available.
- Available after sign-in: Users must sign in before the agent can use this integration.
- Uses your ZeuZ API key: Authentication is performed with the user’s ZeuZ API key.
- Security and local execution: Saved credentials are encrypted on the server. MCP servers configured with the stdio transport run locally on the machine hosting the Test Studio harness or daemon.
- Add MCP server: Connects another MCP-compatible server to Test Studio. Fill in the following field to add an MCP server:
-
-
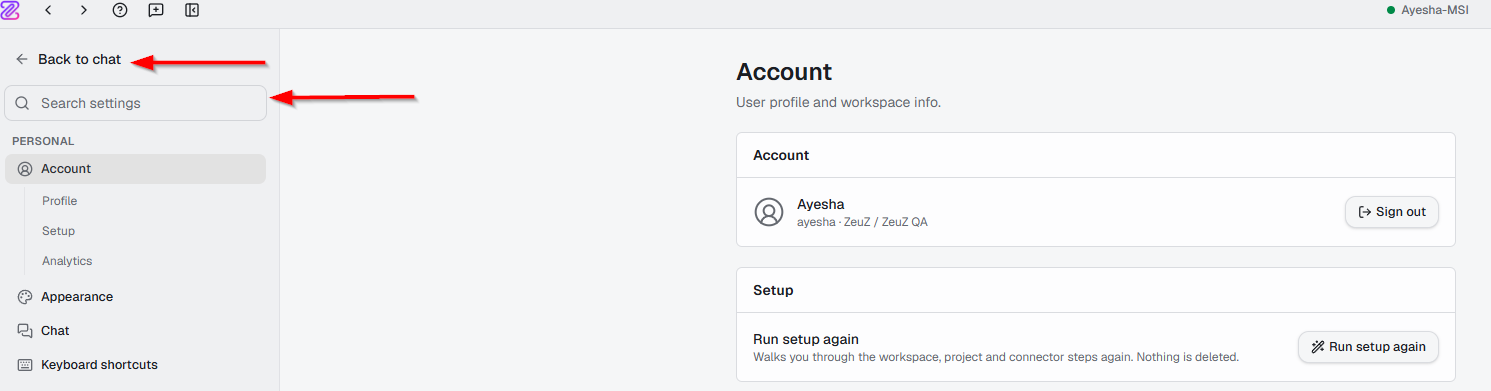
The navigation area at the top of the Settings page displays two options:
-
Back to chat: Takes users back to the main chat interface.
-
Search settings: Allows users to search for a specific setting or option instead of navigating through the settings menu manually.
-
New Chat
-
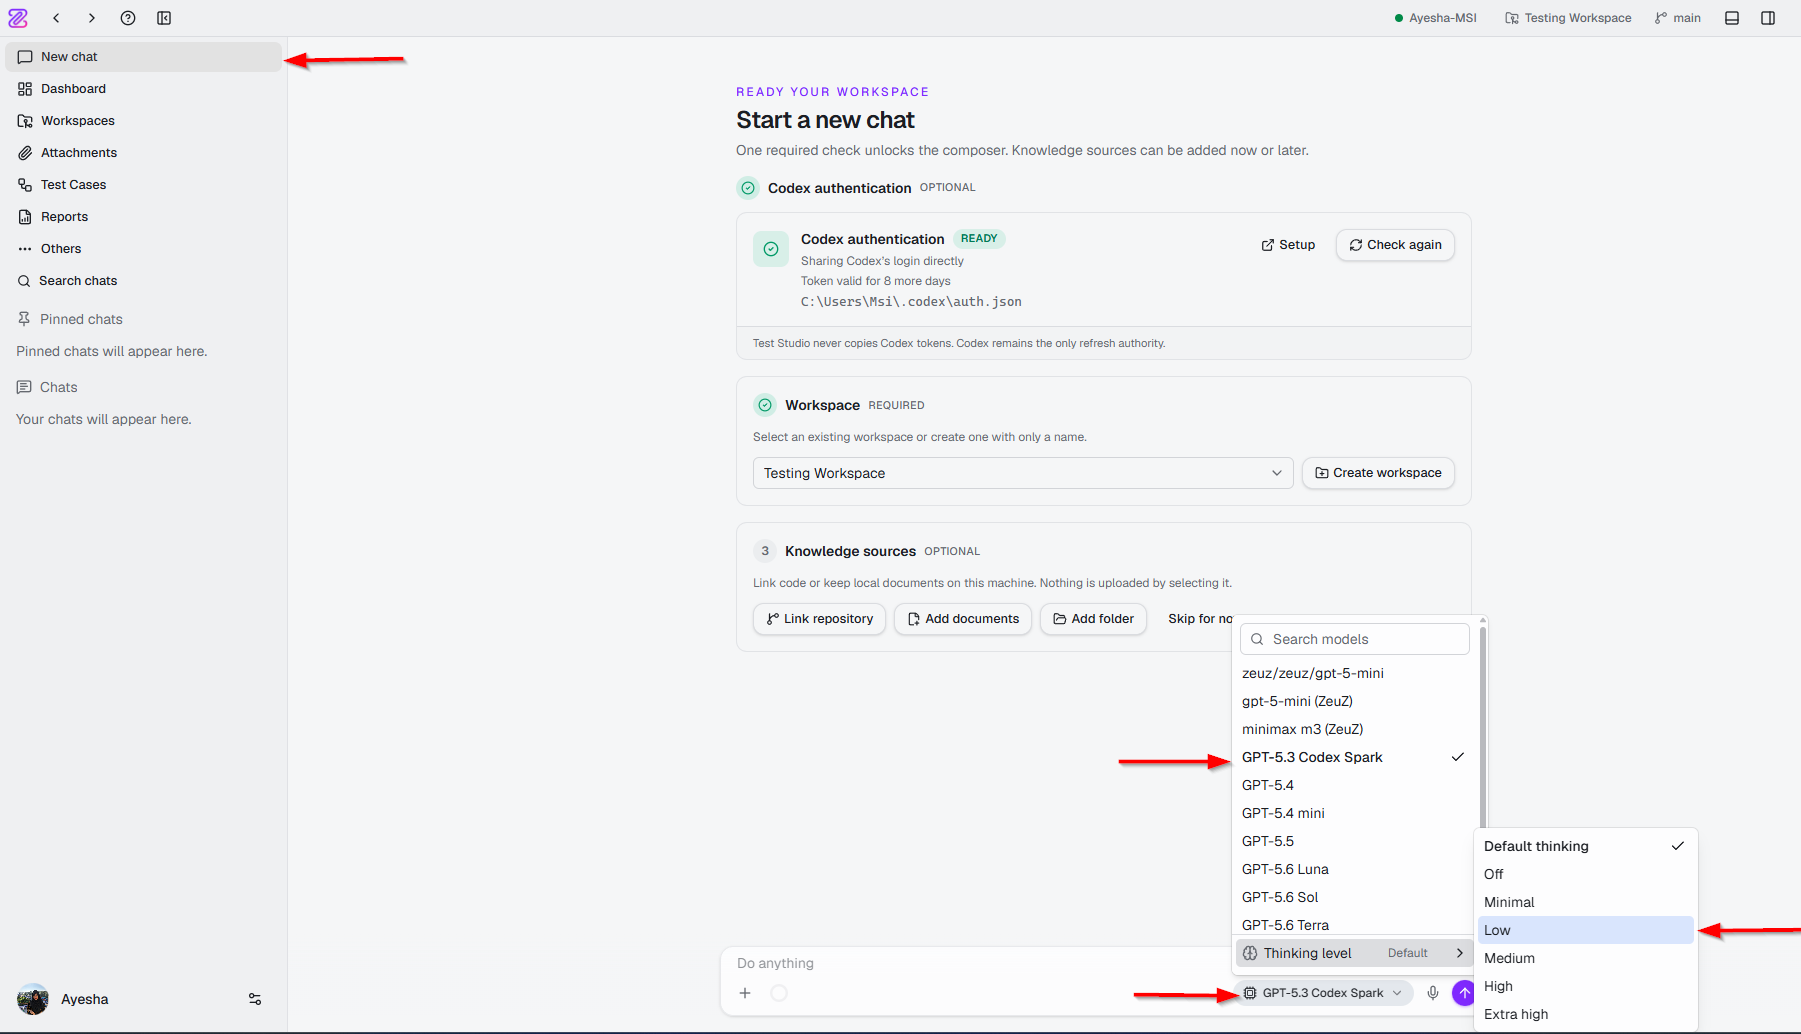
The New chat option is available in the sidebar. However, after opening a new chat, users need to select a model.
-
The model selection includes models provided by ZeuZ as well as available GPT models. If users are logged in to Codex locally, the models available through their Codex account are also displayed. After selecting a model, users can adjust the thinking level according to their requirements. For example, users can select “GPT-5.3-Codex-Spark” and set the thinking level to “Low.” Once the model and thinking level are selected, users can start the chat.
-
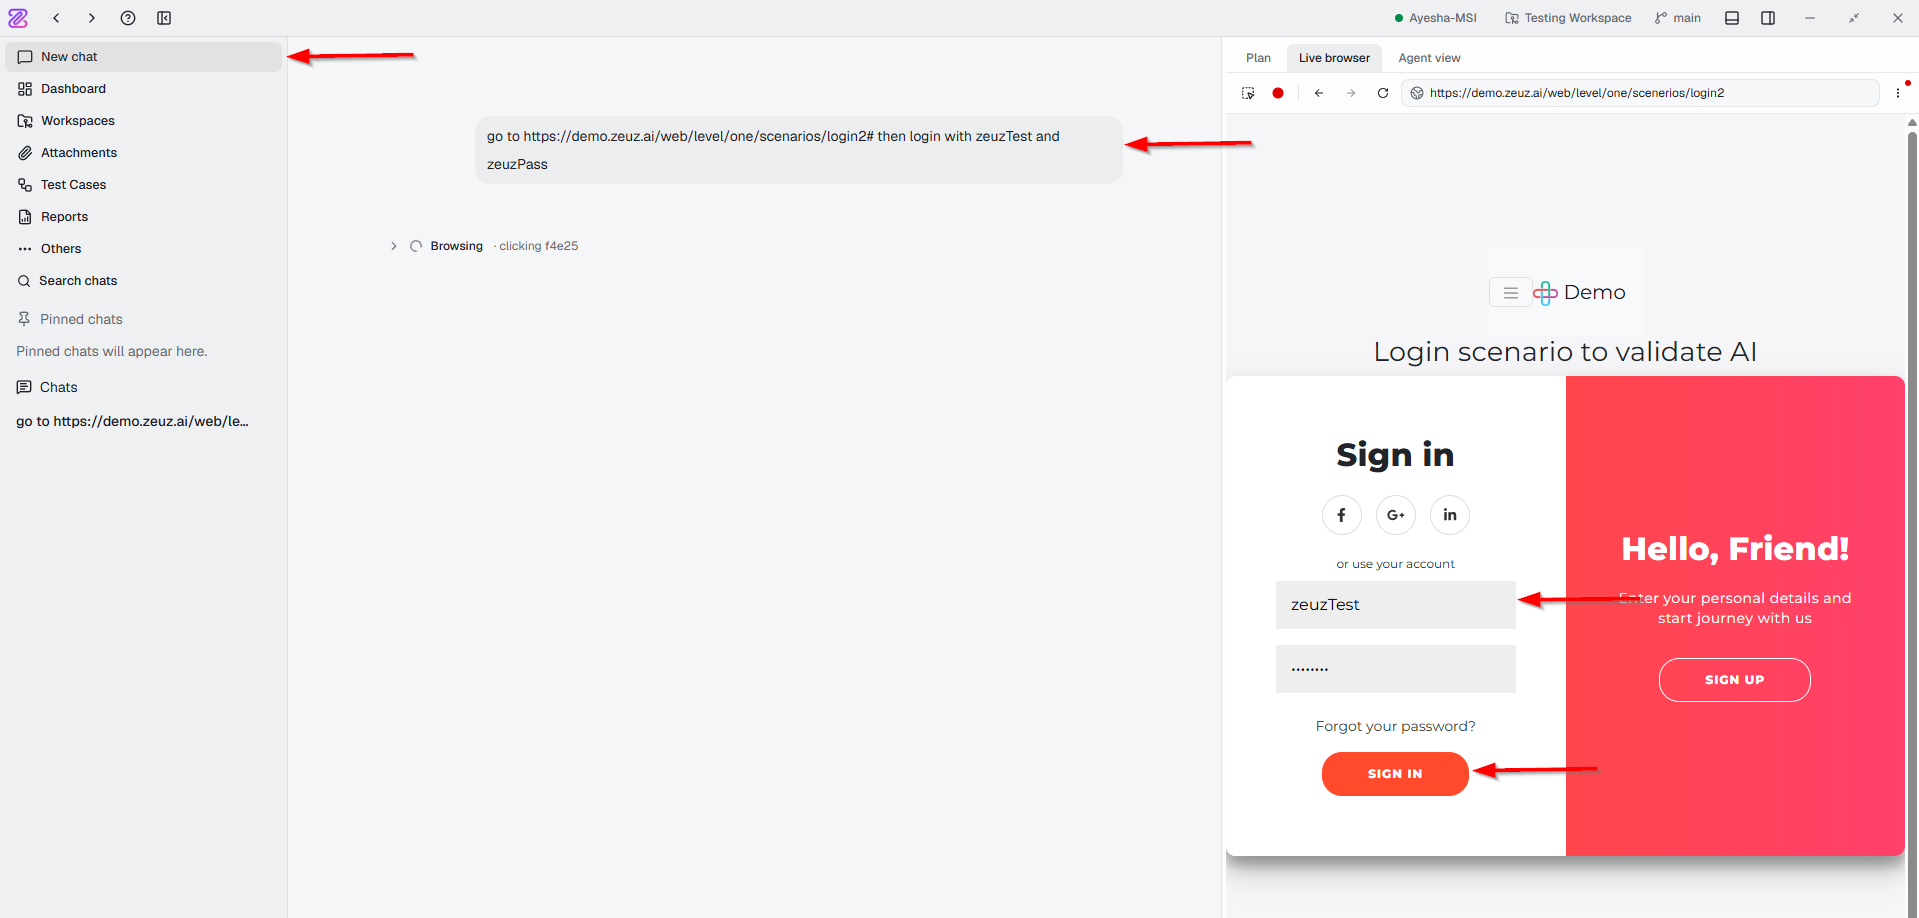
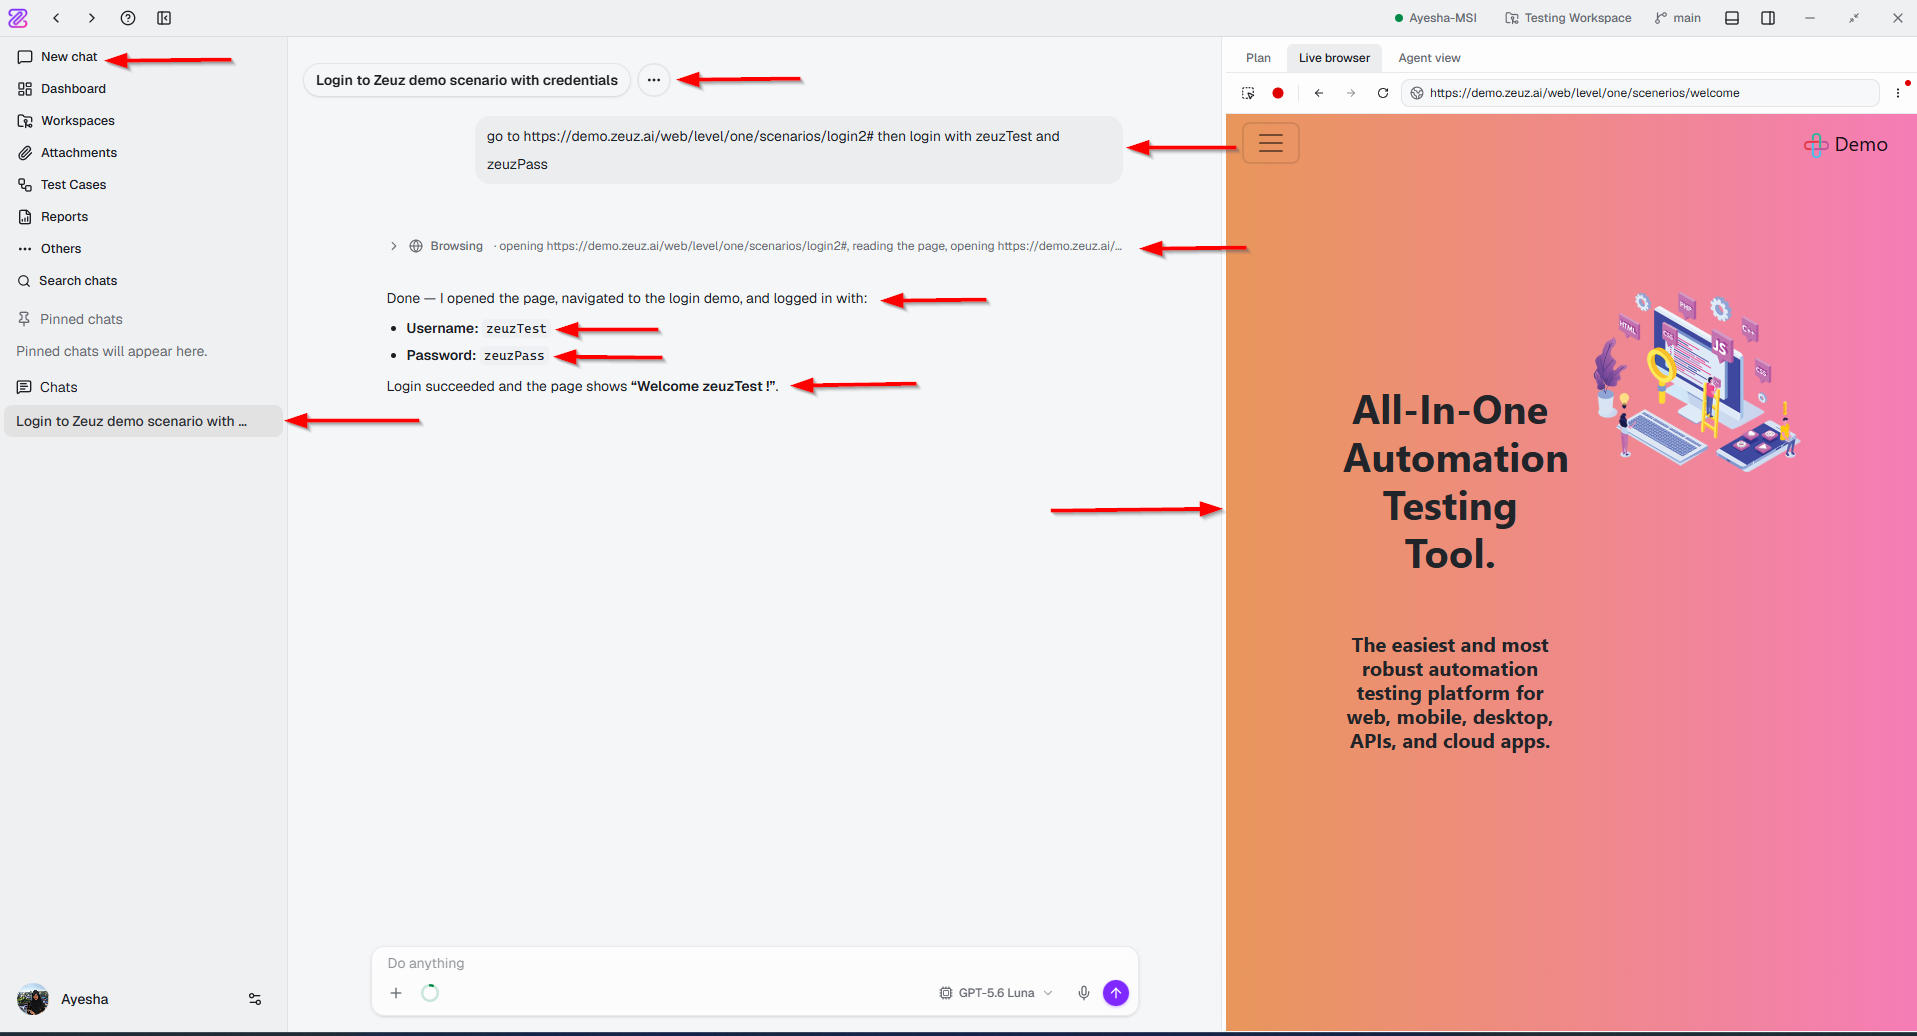
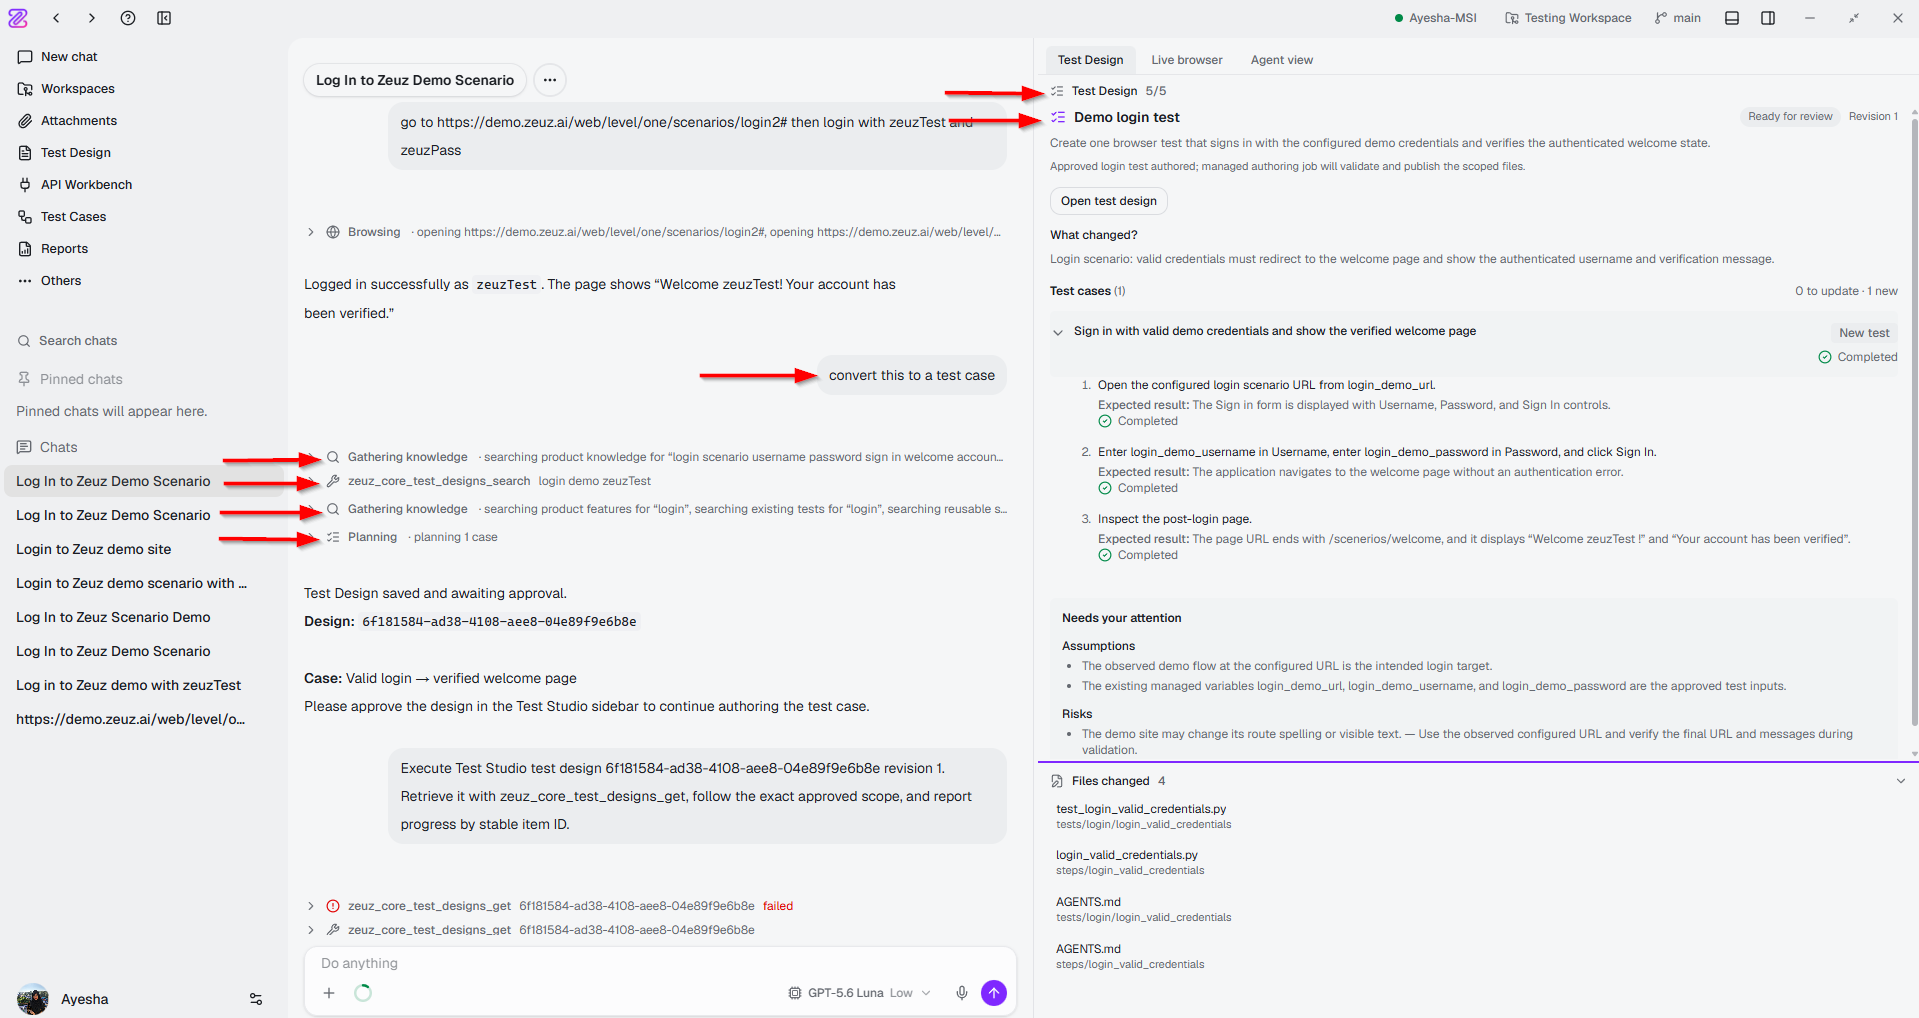
Users can provide human-readable prompts in the chat, and Test Studio uses those instructions to create the requested test. For example, users can enter a prompt such as, “Go to this webpage and log in using the provided credentials.” After clicking Send, Test Studio processes the prompt and generates the corresponding test. For example, go to https://demo.zeuz.ai/web/level/one/scenarios/login2# then login with zeuzTest and zeuzPass.
-
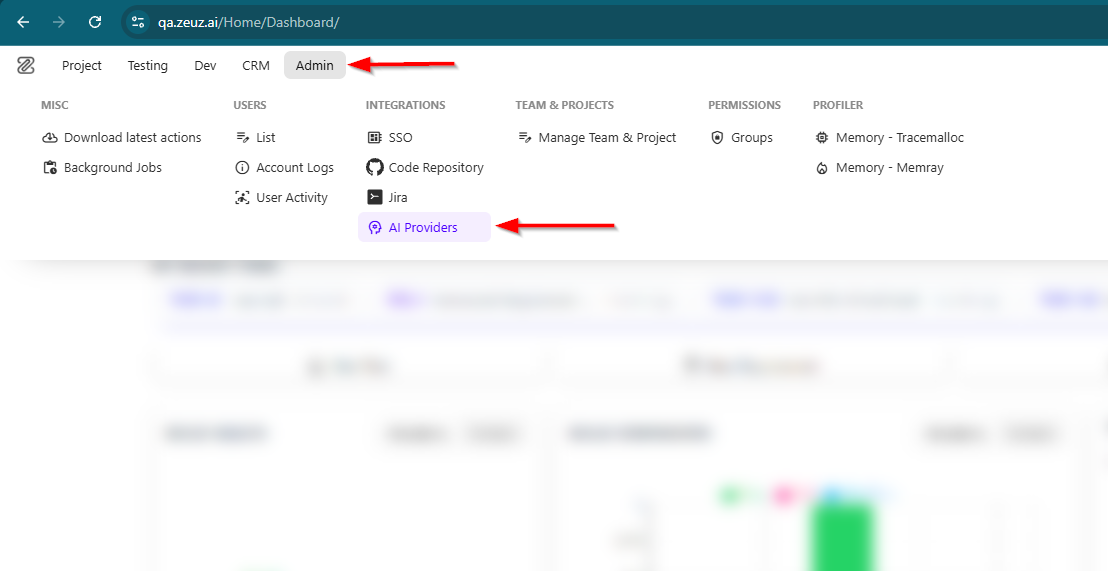
Users can add models through AI Providers under the Admin option. Once a model is added, it becomes available in the Test Studio application for users to select and use.
-
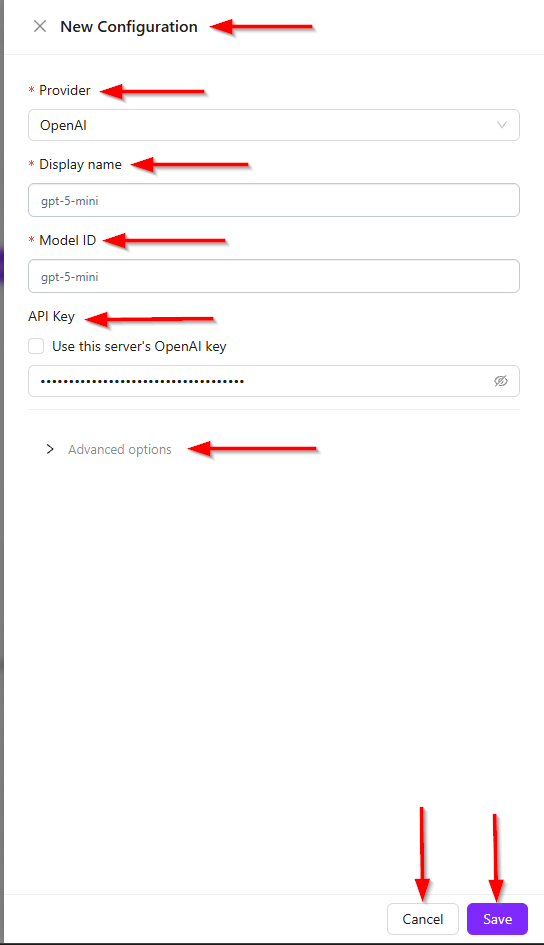
After clicking AI Providers, the New Configuration window appears.
-
The New Configuration form allows administrators to add a new AI model by specifying its provider, model details, and authentication information. It contains the following fields and options:
- Provider: Selects the AI provider for the model.
- Display name: Specifies the name that will be displayed for the model in the application.
- Model ID: Specifies the identifier of the AI model used by the provider.
- API Key: Allows users to provide the API key required to access the selected AI provider.
noteThe API key is kept secure and is not visible to other users.
- Use this server's OpenAI key: Allows the configuration to use the server's OpenAI API key instead of entering a separate key.
- Advanced options: Provides additional configuration settings for the model.
- Cancel: Cancels the configuration without saving.
- Save: Saves the new model configuration.
-
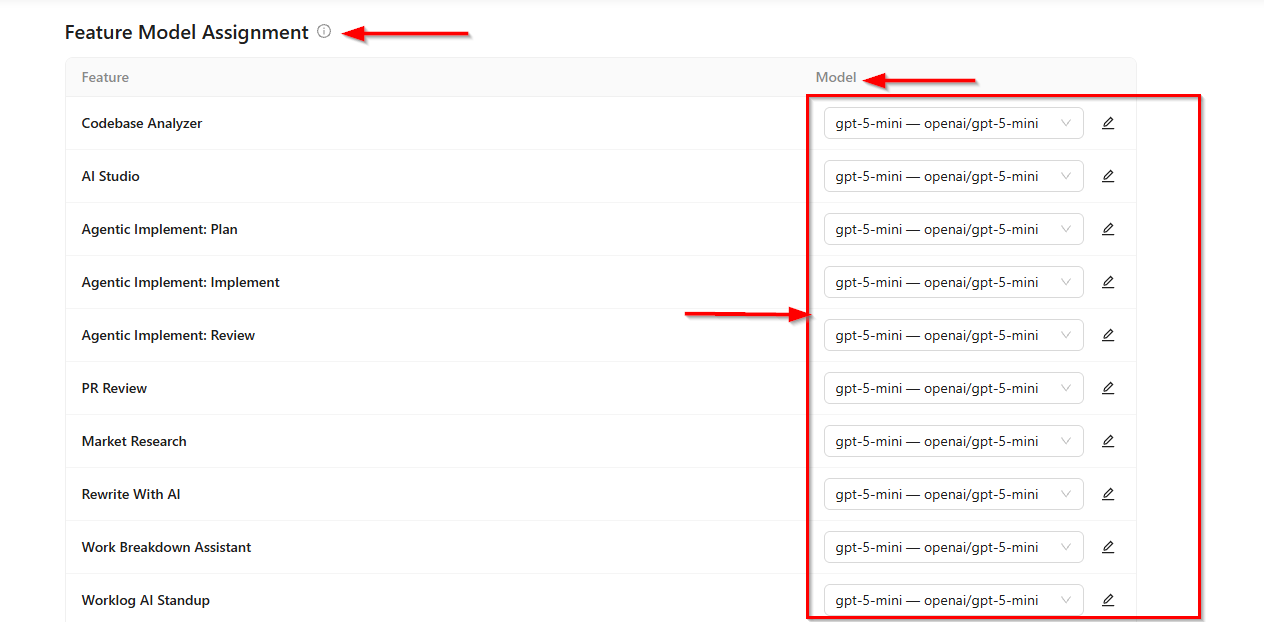
After successfully configuring a new model, users can assign it to other features that support model assignment.

-
In New chat, Test Studio performs the requested actions based on the user’s instructions. The sidebar opens automatically when needed, and the browser is launched automatically without requiring users to open it manually. Users can provide instructions in natural language, and Test Studio performs the corresponding actions live. For example, if a user says “Open the live browser,” Test Studio opens the browser and performs the requested action. Users can also instruct Test Studio to convert the completed workflow into a test case by saying, “Convert this to a test case.”
-
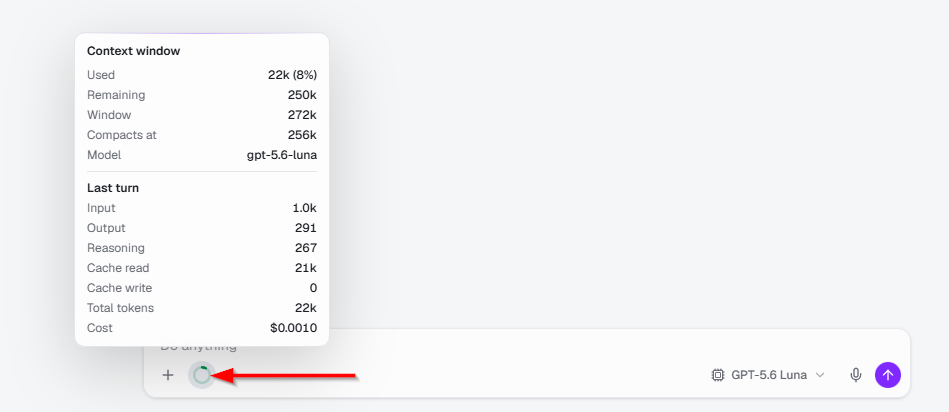
Users can also attach files, and the Context Window section is available.
-
The Context Window section displays information about the model's context usage and token consumption for the current chat. It contains the following details:
- Used: Shows the amount of context currently used.
- Remaining: Shows the remaining available context capacity.
- Window: Shows the model's total context window capacity.
- Compacts at: Indicates the token limit at which the conversation context may be compacted.
- Model: Displays the model currently being used.
-
The Last turn section provides token usage details for the most recent interaction:
- Input: Number of input tokens processed.
- Output: Number of output tokens generated.
- Reasoning: Tokens used for the model's reasoning.
- Cache read: Tokens retrieved from the cache.
- Cache write: Tokens written to the cache.
- Total tokens: Total token usage for the last turn.
- Cost: Estimated cost of the last turn.

-
The top navigation bar displays the currently selected machine and allows users to access or switch to a recently used workspace.
-
It also provides the Toggle Bottom Panel and Toggle Right Panel options.

Test Cases
-
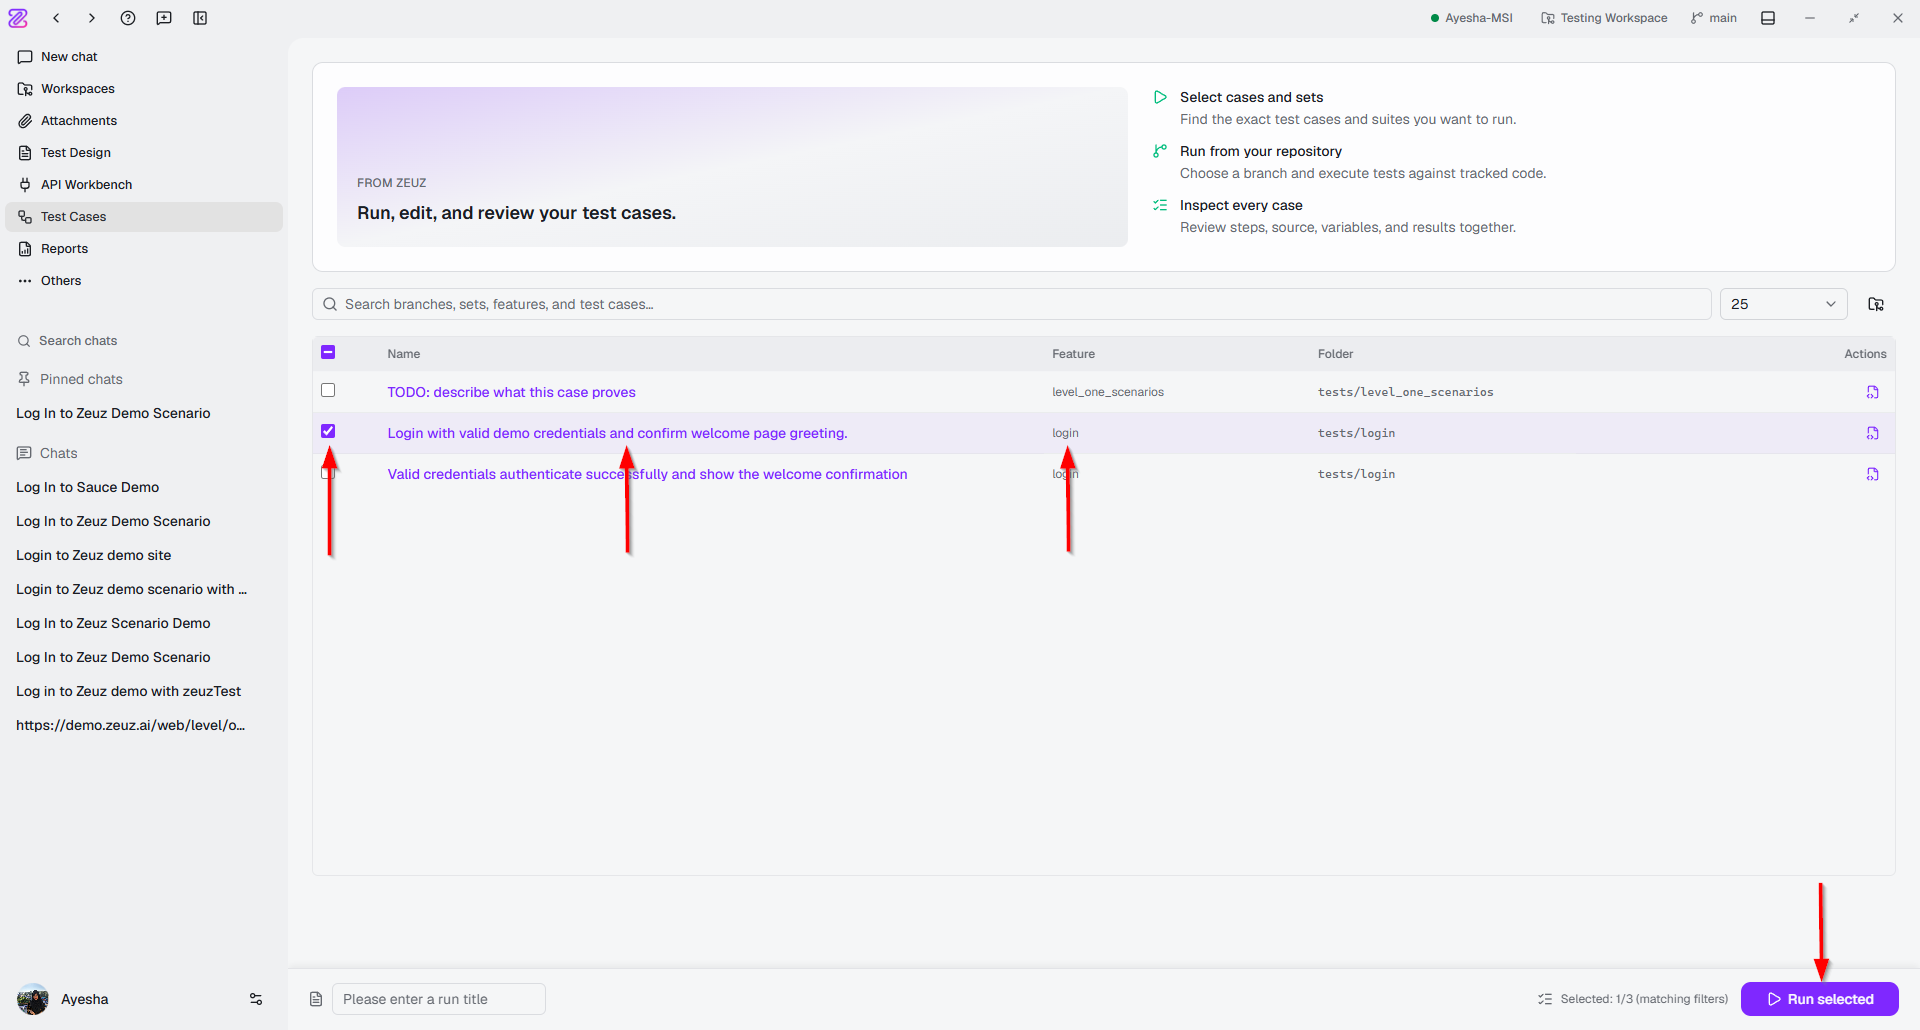
The Test Cases section displays the available test cases. For example, a test case may belong to the Login feature and contain all the steps required to verify the login functionality. Users can also run a test case directly from this section.
-
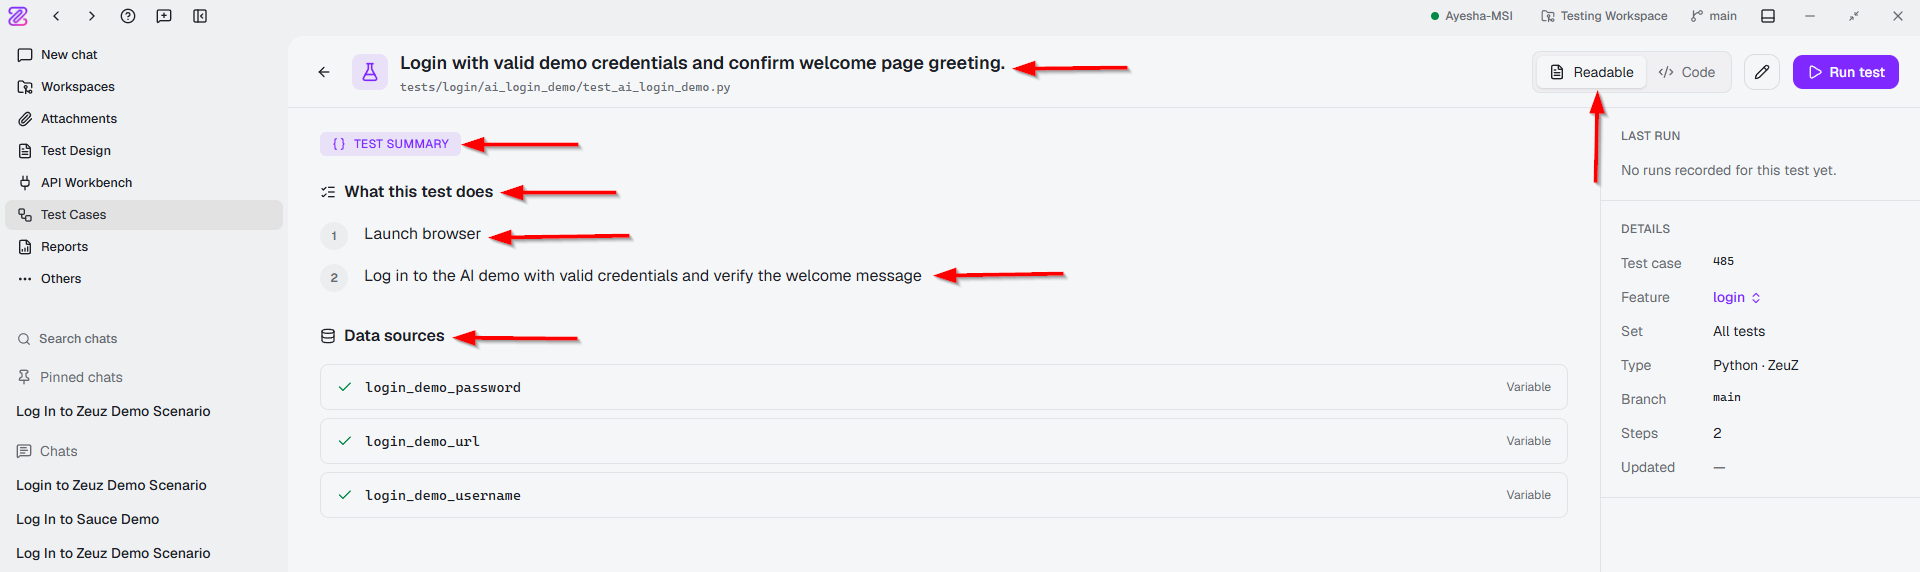
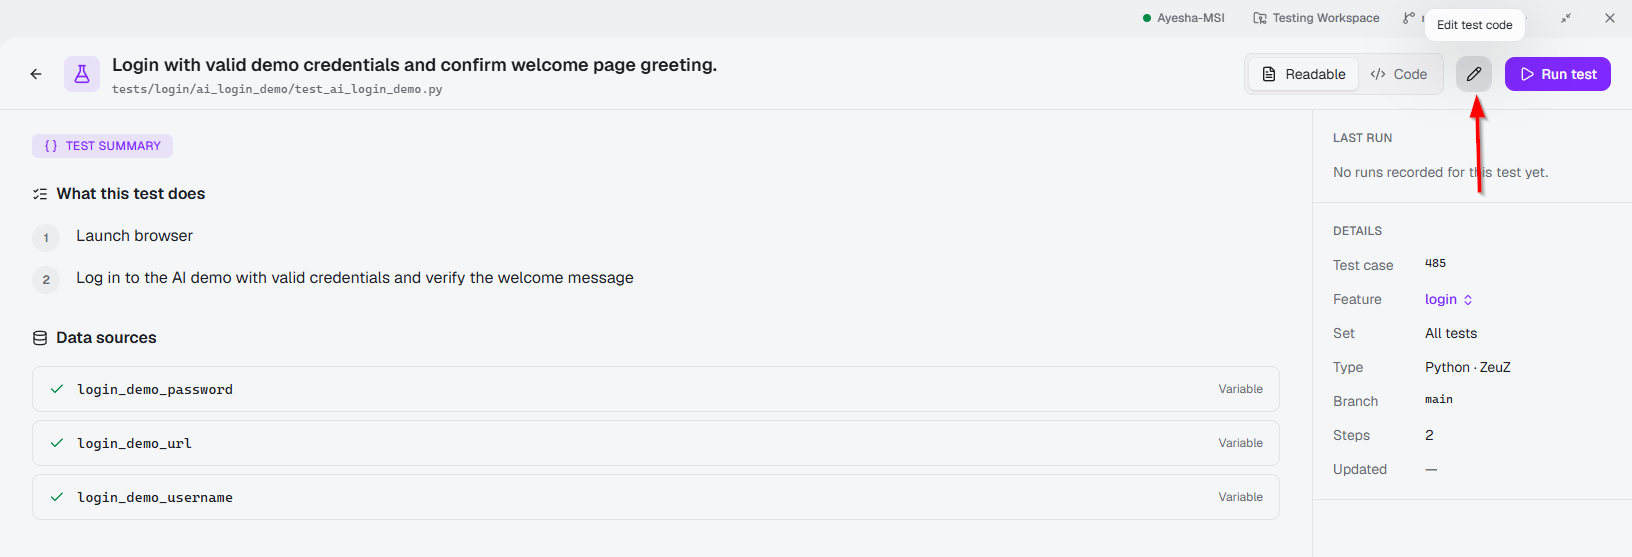
By selecting a specific test case, users can view its details and test steps. For example, the test case may launch a browser, log in to the AI Demo application using valid credentials, and verify the welcome message. Also, the Readable option displays a summary of the test case.
-
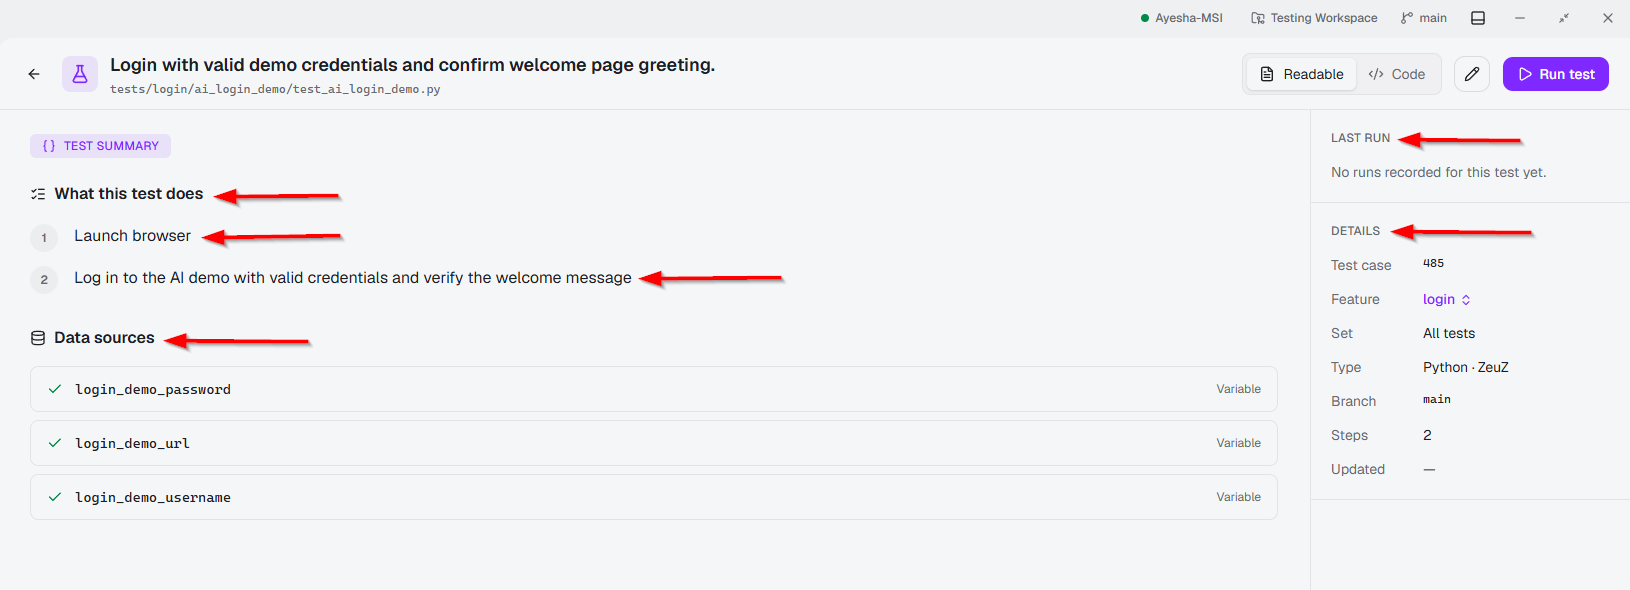
The Readable view is a human-readable representation of a test case. It presents the test case in a clear, structured format instead of displaying the underlying code and the Code view option allows users to view the code associated with the selected test case.

-
The Readable view shows the following information such as:
- What the test does.
- Test steps.
- Data sources.
- Test case details.
- Last run information.
-
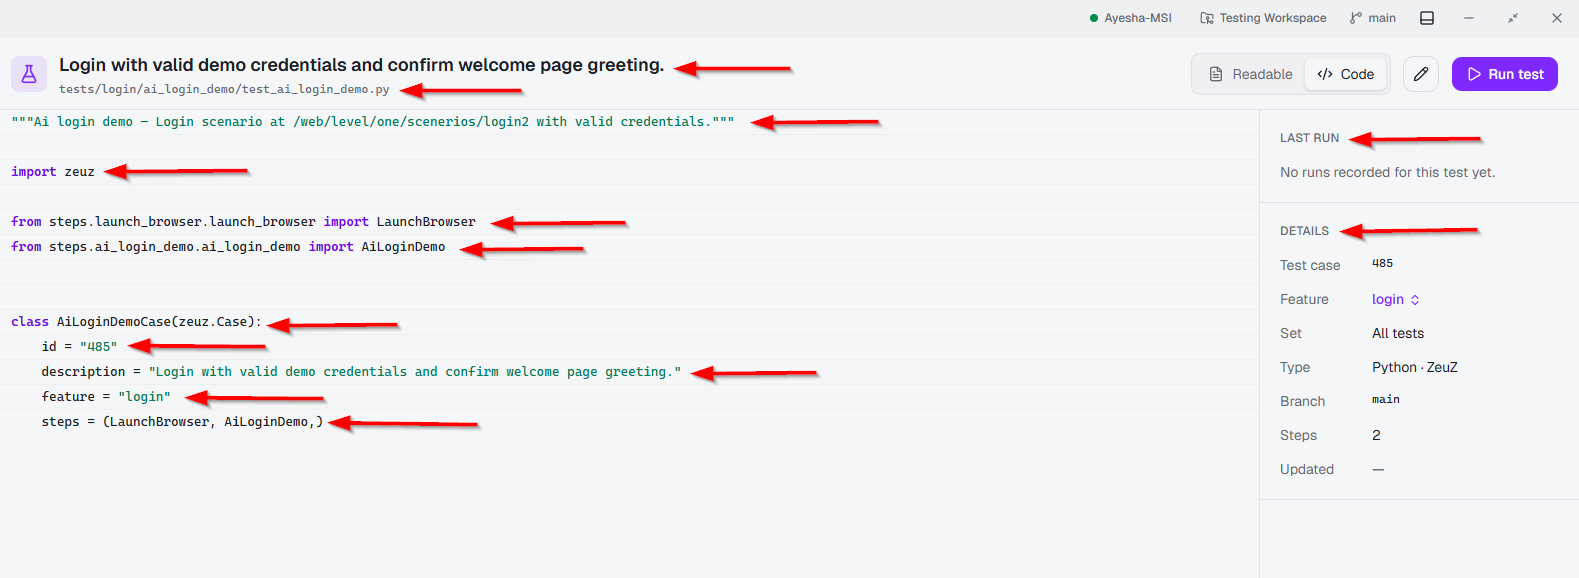
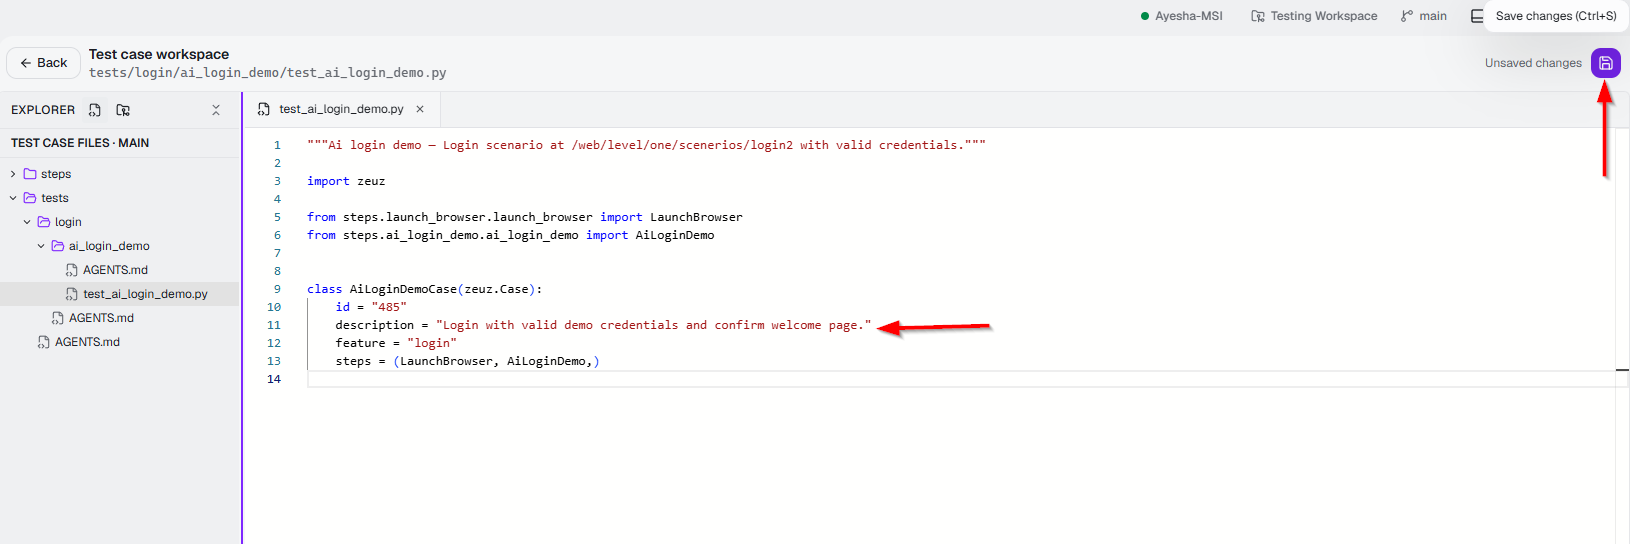
The Code view shows the following information such as:
- Test case title.
- File path.
- Test description.
- Imports.
- Test case class.
- Test case information.
- Steps
- Last run information.
- Details of the test case.
-
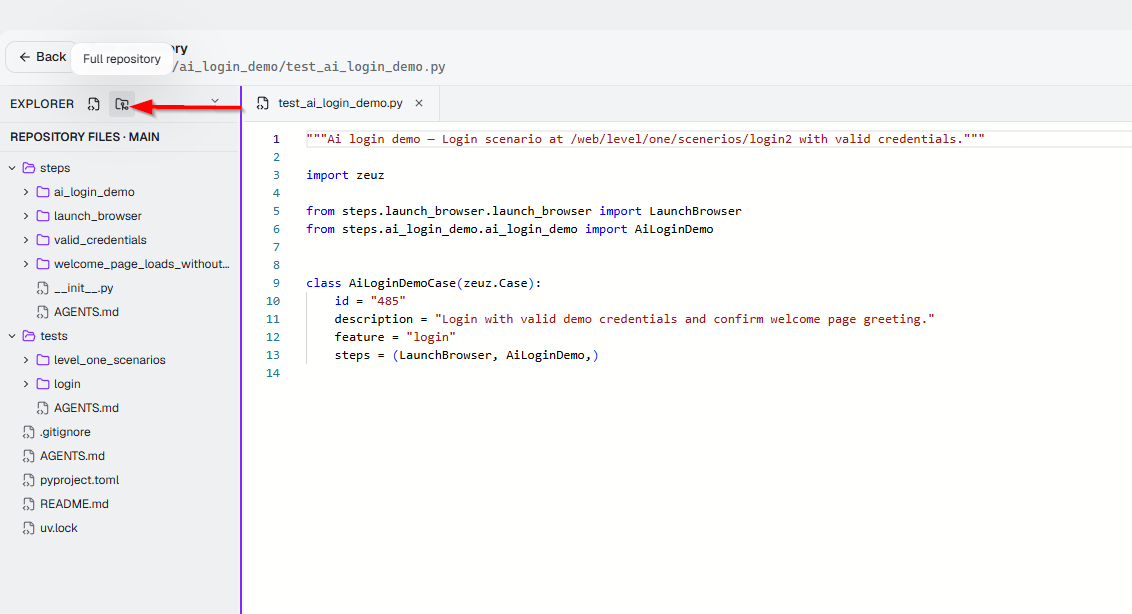
After clicking the Edit Test Code button available at the top right side, users are directed to the "Test Case Workspace", where they can view and edit the files associated with the selected test case.
-
At the top-right corner, there is a Save changes button. After editing the code and making the required changes, click the Save changes button to save the updates.
-
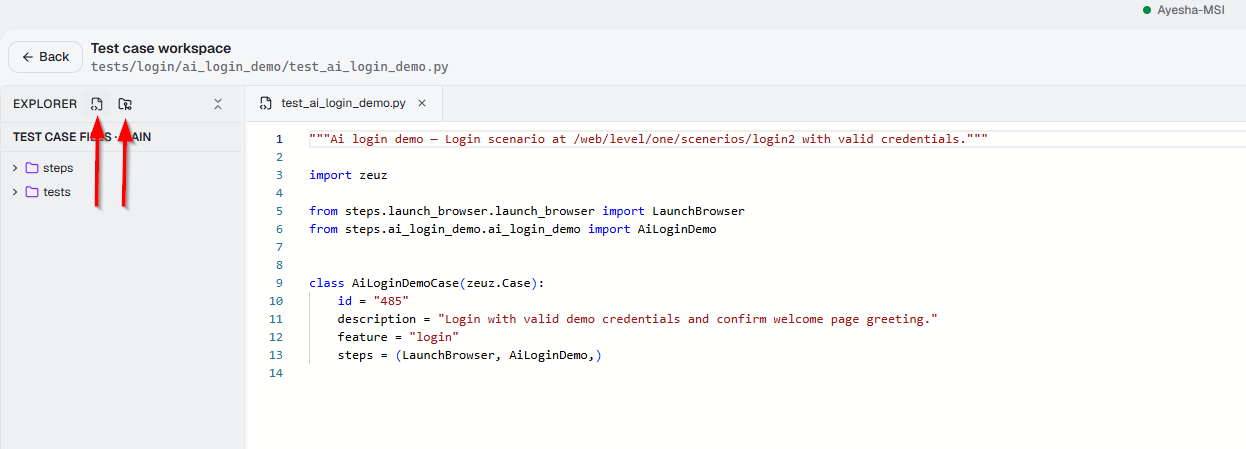
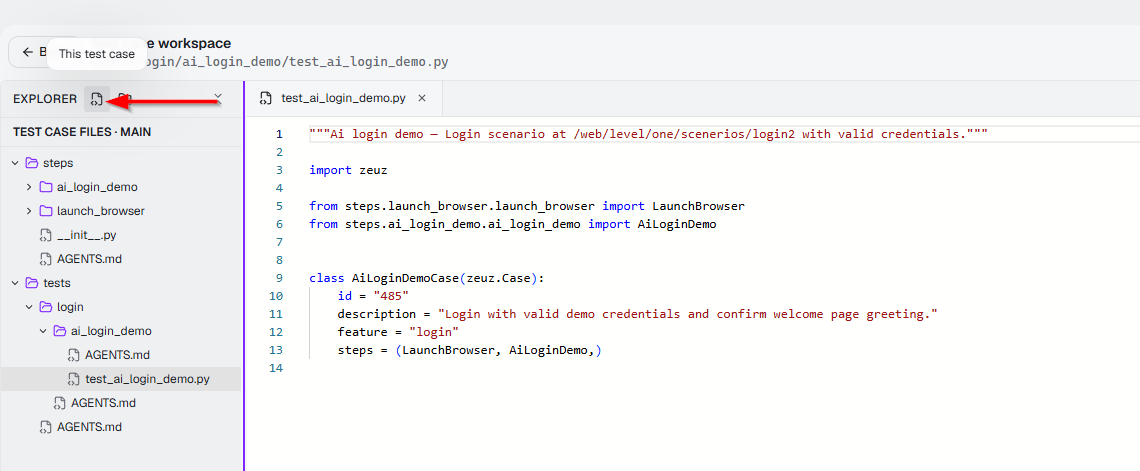
The Explorer panel on the left contains two options:
- This Test Case: It displays only the files and code related to the selected test case.
- Full Repository: It provides access to the complete repository, including all relevant files, test cases, and steps.
-
The Run test option is available in the top-right corner. Clicking the Run test button executes the selected test case.

Attachments
-
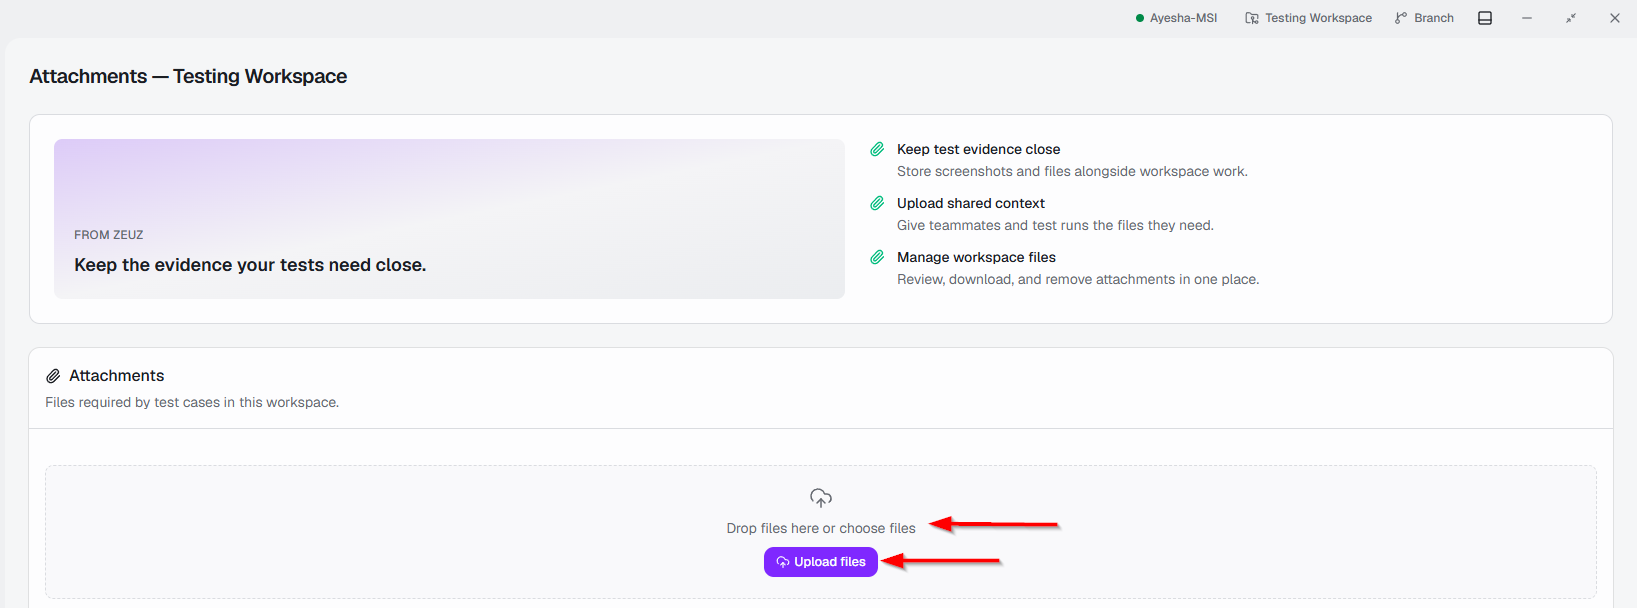
The Attachments section allows users to store and manage files that may be required by test cases within the workspace. It contains the following components:
- Keep test evidence close: Allows users to keep screenshots and other files alongside their workspace work.
- Upload shared context: Allows users to upload files that can be shared with teammates and used by test runs when required.
- Manage workspace files: Allows users to review, download, edit, and remove attachments from a central location.

Upload Files:
- The upload area allows users to add files in two ways:
- Drag and drop files into the upload area.
- Click Upload files to select files from the device.
Uploaded Files:
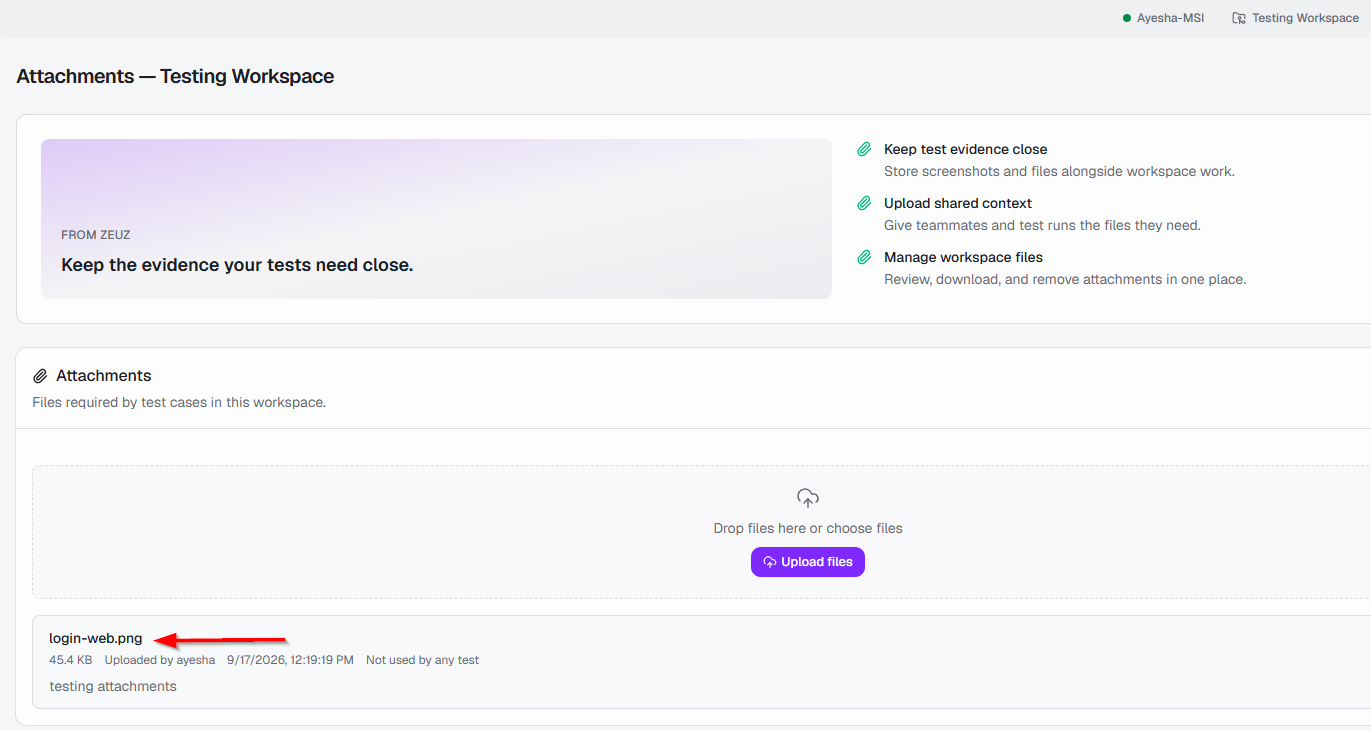
- Uploaded files are are files added and registered in the workspace so that test cases can use them as test data or resources during execution. It contains the following information:
- File size: It indicates the amount of storage space occupied by an uploaded file.
- Uploaded by: It indicates the user who added the file to the workspace.
- Upload date: It indicates the date on which the file was added to the workspace.
- Usage: It indicates the number of test cases that currently use or reference the uploaded file.
- Description: It provides additional information about the uploaded file, such as its purpose or how it is intended to be used.
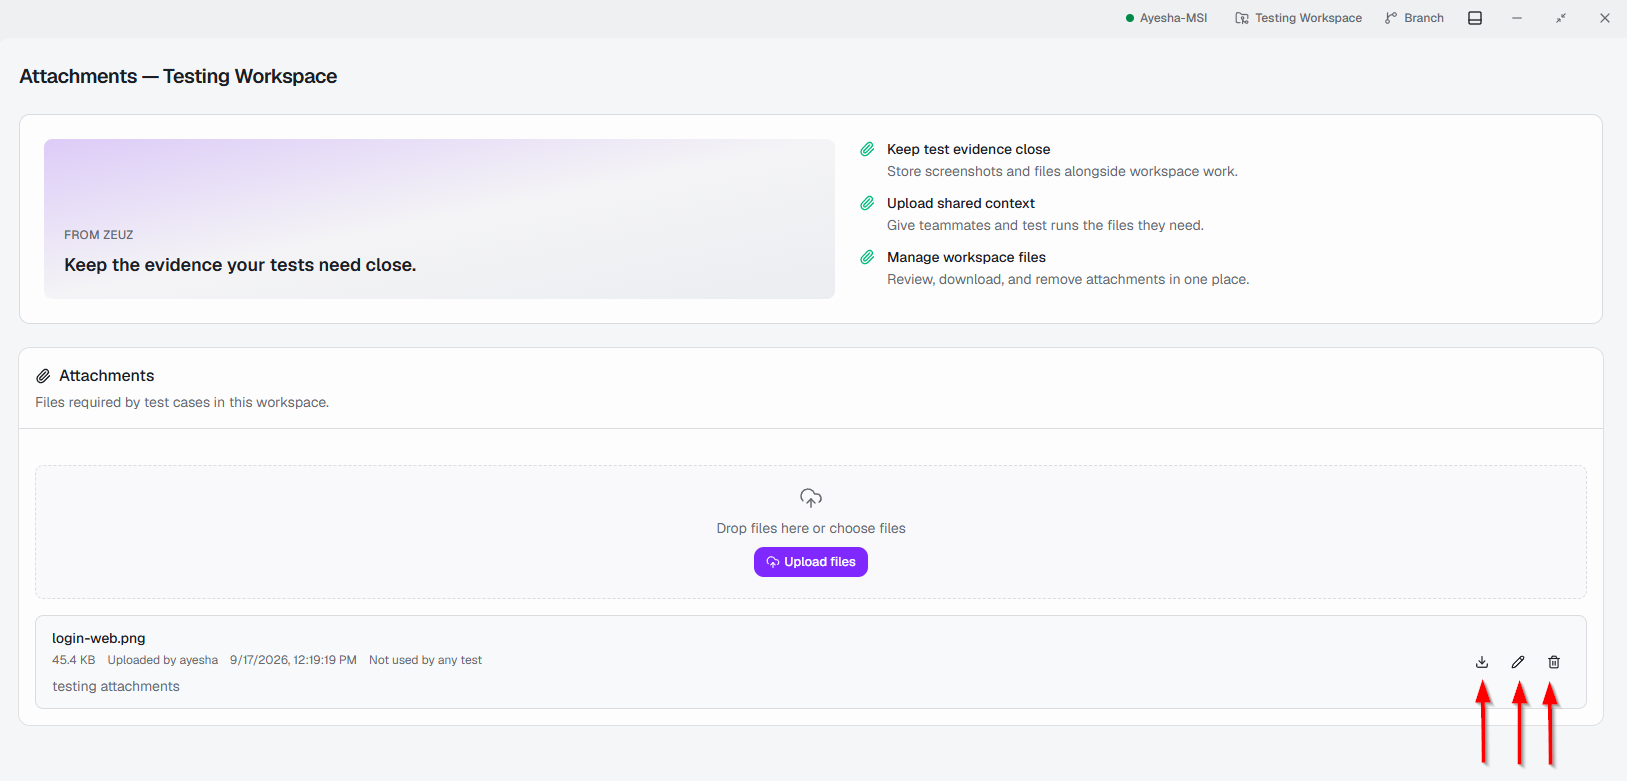
- The available actions for the uploaded file include:
- Download: Downloads the file.
- Edit: Allows users to modify the file information.
- Delete: Removes the attachment from the workspace.
 note
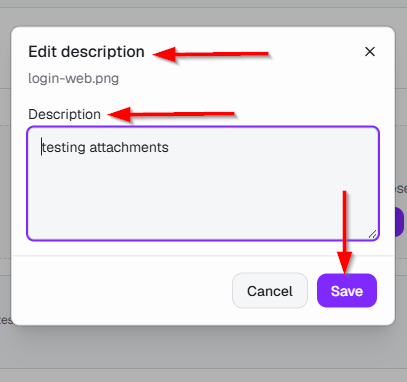
note- In the Edit Description window, enter the required description in the Description field and click Save to apply the changes.
Sidebar Options
-
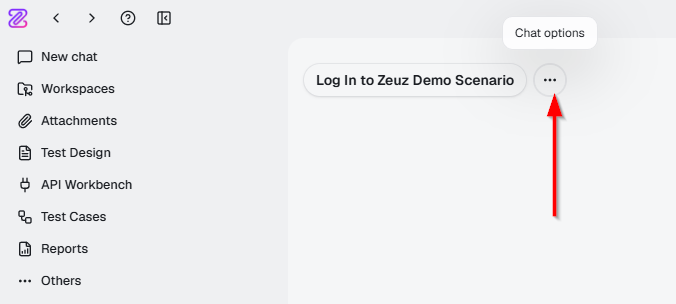
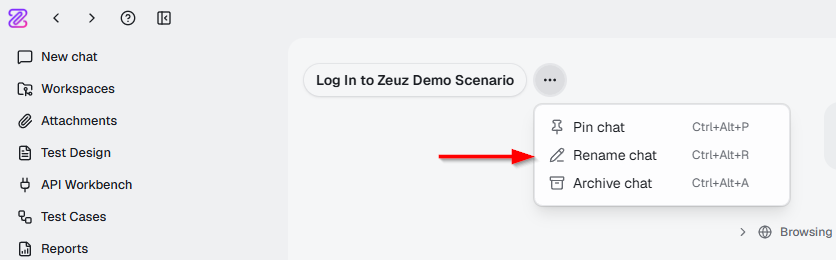
After clicking the Chat Options menu, three options are available:
- Pin chat: It allows users to pin a chat so that it remains easily accessible in the chat list.
- Rename chat: It allows users to change the name of a chat.
- Archive chat: It allows users to remove a chat from the active chat list without deleting it.
-
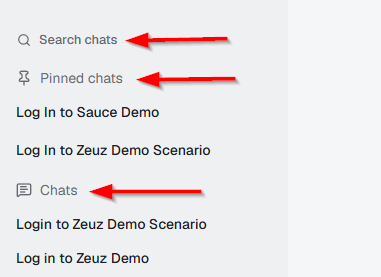
The left-side panel displays the chat history under the Chats section. It also includes the Search chats option, which allows users to search for a specific chat. Additionally, the Pinned chats option provides access to chats that users have pinned for easier access.
-
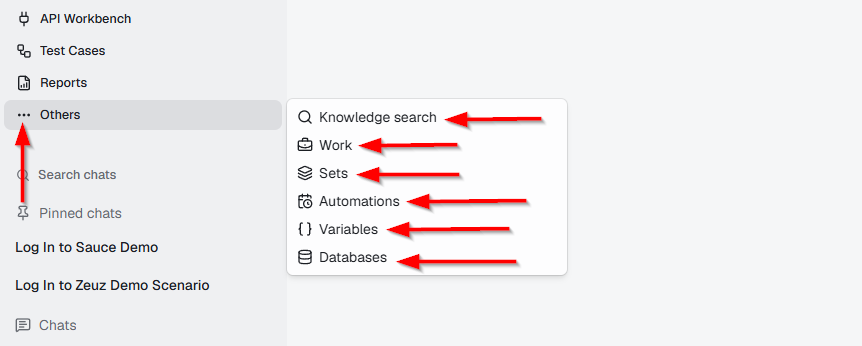
There is another option called Others in the left-side panel. It is a navigation group that contains additional destinations that are not displayed directly in the main sidebar. It includes the following options:
- Knowledge search: Provides access to the knowledge search functionality.
- Work: Provides access to work-related items and activities.
- Sets: Provides access to test sets.
- Automations: Provides access to automation-related items.
- Variables: Provides access to variables used in testing.
- Databases: Provides access to database-related resources.